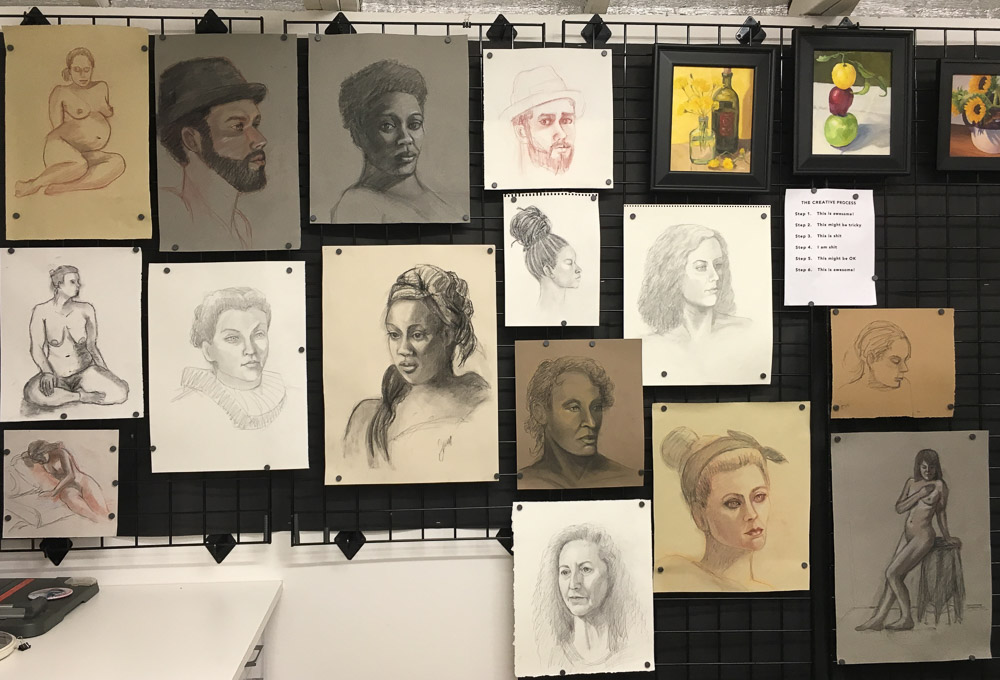
I just made a big leap in my understanding of figure and portrait drawing so wanted to share previous sketches and paintings before the new work. Above is a photo of the “figure drawing wall” in my studio. I’d covered this wall with black non-fade bulletin board paper to avoid reflected light when I’m at my easel (that stands just to the right of this photo). Then I hung black metal grid panels that I got super cheap on Craigslist and use little magnets to stick the drawings to the grid wall. Now it’s easy to add, move or replace drawings with better ones as my skill improves and I can hang framed paintings from it with grid wall picture hooks.
Below are assorted figure and portrait drawings from past Friday Figure Drawing sessions. Click on any image to go to slide-viewing mode and click through them using the arrows on each side.
Charcoal on paper
Pregnant Mama, conte on paper
Woman with headdress, charcoal on paper
Charcoal on paper
Fallon in Elizabethan Collar, Pencil drawing
Top Knott, charcoal on paper
10 Minutes, charcoal on paper
Hat Guy, Conte on Paper
Conte drawing from first 20 minute session for underpainting
Brian in conte, 1 hour, trying to see the planes of his face
Found on the Street #1, Candlestick and Apples, oil painting on panel, 8×8″ (Click image to enlarge)
This is one in a series of paintings of free stuff and things found on the street during my walks in the Berkeley, California area. The little apples had fallen from a neighbor’s tree and the candlestick was in a free box on the curb. Below are photos of some steps in the work in progress of this painting (which is available to purchase from my Daily Paintworks gallery here) and a couple of cool studio tips too.
Hi! Come on in and let me show you around my new studio. The concept for the studio began in 2000 when I bought my cottage, a 1940s duplex. I planned to use the front unit as my home and the rear unit as my studio while still working at my “day job.” When the time came that I could leave to paint full time, I planned to rent out the back apartment for extra income and convert the 400 square foot garage to my studio.
The rear unit studio was wonderful and I spent many happy hours painting and teaching there. But the new studio is even better! Even though it’s near my house, it’s completely separate so the distractions of laundry, dishes and computer; the nagging of cats for dinner; email and phone calls disappear and painting time flows uninterrupted.
Before the tour, here are “before” pictures of its former life as a grease-monkey garage where my son worked on cars.
The garage before it was transformed and the 1970 Firebird Cody was (still is) restoring
The bare garage walls had 40 years of grease and grime and Bondo dust and the concrete floor was badly stained and cracked. The only electricity came in from an extension cord.
Huge engine under constructionBackyard before door and deck
The only entrance was the heavy and awkward sliding barn doors on the driveway side of the garage. Now I’ve transformed the old garage from a place for pursuing a passion for pistons to a passion for paint.
Deck and door to studio
I added the doors and deck (though the contractor’s mistakes led to it not being a two-steps up raised deck as planned–but it islevel unlike how it seems in the photo). The high-maintenance funky grass is gone, replaced by gold fines which makes it feel like a beach. Now it’s a great place to set up a still life and paint outdoors and I love eating lunch and reading out here too.
Here is a 6 minute video tour, and below that, pictures with more detail.
In the video and photos below, you can see that I love good art tools. I have collected this studio equipment and supplies over many years of painting. Much of it I bought secondhand or long ago.
Every time I paint I learn something. This time I learned some new tricks with different brushes and mediums and also about how much easier it is to paint in a good mood than a bad one. I painted the radishes for last week’s Daily Paintworks challenge, “Paint your vegetables.” It is available there on my new Daily Paintworks page.
I painted the radishes over Sunday’s painting of cucumbers that didn’t work because of my bad composition (or my bad mood when I was painting it) not sure which. I liked the lemon slice in the painting so I took a photo before I scraped off the panel for reuse. Here is the happy little corner of the painting with the lemon slice (and without the two big ugly cukes at the top):
Cucumbers and Lemon, corner of painting
And here is the promised Still Life With Cat, shot when I put the radishes back in the fridge and silly Busby decided my still life light box would make a nice kitty sauna.
Still Life with Cat
I’d probably look grouchy too if someone tried to take a picture of me in the sauna!
Happy New Year! Thanks for hanging out with me this past year! Even though I’ve had a nasty cold all week I managed to get in some pomegranate painting between nose blowing, naps, and chicken soup breaks, but not nearly as much as I’d hoped to do over my year-end vacation.
Pomegranate value study in oils, 8x5"
I only had enough energy to be in the studio for a couple of hours a day but fortunately the pom waited nicely for me. I started by doing a value study in oils (above), trying to sort out where the darkest darks and lightest lights are and just how dark and light they are.
Pomegranate quick study, oil on board, 5x7"
I did a small study next since I knew I didn’t have more than an hour or so of painting energy. I had fun with this and feel like I’m starting to find a way to get loose and sketchy with oils.
Pom under Reveal bulb
I used a GE Reveal light bulb in my lamp which gave everything a pinkish-lavender cast and that’s why I named the painting “Pomegranate Revealed.” GE says they are “specially made to filter out the dull yellow rays produced by standard incandescent bulbs.” I’d bought it originally thinking it would simulate daylight but it doesn’t at all. I usually use a fluorescent 5000K bulb 40 watt bulb (equal to 150 watts) which does a better job of producing clean light.
Cropped in Photoshop to 8x10"
When I compared the final painting and the studies I realized I liked the original composition with less background better so I experimented with cropping the painting in Photoshop. It’s not hard to cut the board down if I decide to crop it for real.
What do you think? Do you like this cropped version or the “final” version at the top of the post better?
I just needed to sketch something, anything, yesterday, and this rubber tree plant outside my studio window was glowing in the sun. My son Robin gave it to me as a housewarming gift 10 years ago when I bought my combo home/studio (a duplex; one unit is my house, one is my studio).
I wanted a rubber tree because of that catchy old song about an ant who believes he can move a rubber tree plant ; buying my own house was a dream about as big as that little ant’s and I did it. (Sinatra sings the song below, but be warned, you won’t be able to get it out of your head after you listen.)
The plant got too big for the living room so I cut half off half and stuck that in the ground. I took the other half to my office. The plant in my downtown Oakland office is sorely abused but just keeps on growing anyway.
I spent most of the day yesterday working on rebuilding my website which seemed like a very indoor thing to be doing on such a sunny day. But after sketching outdoors for half an hour I realized how deceptive that sunshine was: it was cold out there! And then I was happy to be indoors.
Yesterday I signed up for Bookbinding I on January 9-10 at the San Francisco Center for the Book. Maybe when I can bind my own sketchbooks I’ll be able to make one that fits on my scanner and doesn’t leave a big blurry section in the middle. While I love the Fabriano Venezia sketchbooks I’ve been using the past 6 months or so, they’re just half an inch too big to fit.
On Wednesday night I completed the last page in a sketchbook with some writing about the frustrating process I’d been through with the orchid painting. And then, as I did one last sketch of the orchid in the book (below) I realized how I might be able to actually make the painting I’d originally envisioned. It would be one I could do simply and be able to write about as the six-step process the publishers needed.
When I woke up on at 6:00 a.m. on Thanksgiving morning I realized I had to give it another try. The image above is the happy result.
My sketchbook breakthrough
Tonight my watercolor group met for dinner and a chance to share what we’ve been painting this month. When I showed them the two versions of the painting they liked both but Susie said that in the first version they looked like evil man-eating orchids, which is certainly how they felt to me. In the sketch above I thought the orchid looked like it had packed his bags and was running away, suitcases in hand. (Good riddance!)
Here is one of the MANY pages of tests and samples I made in trying to find the right pigment combinations to make this painting work.
Orchid watercolor test page
I decided the pigment that gave me the color I wanted was Winsor Newton’s Quinacridone Magenta but like most quinacridones, it wasn’t very civilized, trying to spread everywhere.
Orchid Painting Steps
What finally worked was painting the veins first on dry paper, wetting a petal, painting cobalt blue just inside the perimeter and then dropping in the Quinacridone Magenta in the center, letting it spread and then blotting up a bit of the paint as needed.
Busby relaxing amidst orchid chaos
At least someone got to relax in the sun. When I left to make a cup of coffee Busby napped amidst the orchid chaos on my desk. You can see the original reference photo peeking out from under him, with a pile of false starts at the painting behind that.
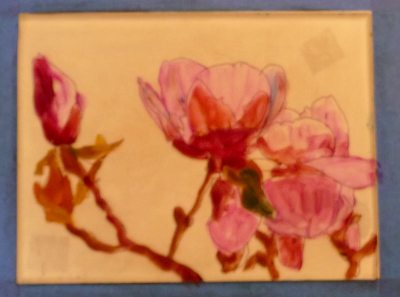
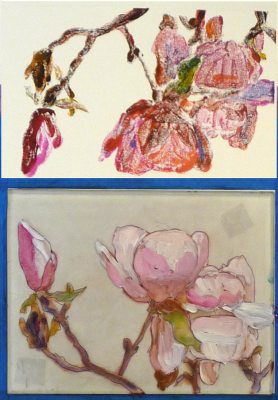
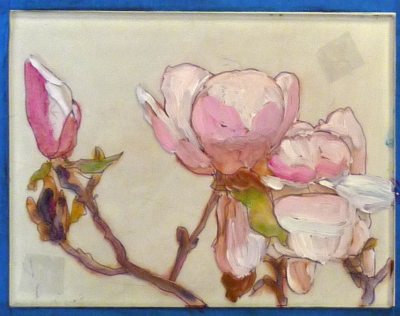
"Lovers Mongrels Curs #1 M.H.", Acrylic on canvas, 28x22"
It’s not what you might think, based on the above work in progress. It’s that I finally started the series of paintings that I’d been waiting on for over a year. I hadn’t realized it, but I was waiting for the painting to tell me how to paint it (see below about intuition and broccoli).
I’m just having so much fun with the series and haven’t wanted to use time I have for painting being on the computer. Also I wasn’t sure if I was ready to post what I’m working on yet. I’m also not sure how much I want to share about each painting and the series as a whole, except to say that it’s sort of auto- and bio- graphical, about the men who’ve played a role in my life, hence the title of the series: “Lovers, Mongrels and Curs.”
This painting is the first in the series and it is still a work in progress; a little sketchy but I like it that way and may just leave it…or not.
I followed the saying, “If you don’t know what to do, just wait until you do,” instead of forcing the start of the series. It just took some down time to conceptualize how the series needed to be painted and for the ideas to bubble up (literally: I was on vacation, lying on my back on the deck of my little, private, open-roofed, hot-tub room at Albany Sauna, watching the clouds float by overhead while the hot tub bubbled beside me when it came to me that the series needed to be painted large, in acrylic.)
I wanted to work on two paintings simultaneously, side by side on the wall so first thought of using gessoed paper or unstretched canvas, finally settling on stretched canvases. But how to hang them?
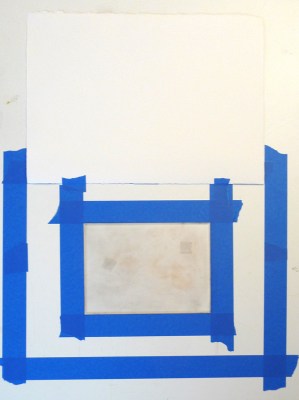
Using Velcro to Hang Canvases on the Wall for Painting
After some brainstorming I found an easy way to mount two canvases side by side on the wall without harming the wall or making holes with nails.
2 canvases mounted on bulletin board with Velcro
I applied a few strips of Velcro along the top rail of my 36×48″ metal framed bulletin board already hanging on that wall (the cork is covered by a sheet of paper pinned to it). Then I measured and matched the other half of the Velcro strips to the backs of the canvases and stuck them together. To stabilize the canvases a bit I put a few large push pins along the bottom and sides. It’s working great!
Listen to Your Broccoli poster, colored pencil, 16x14", created after reading Bird by Bird in 1994
“There’s an old Mel Brooks routine, on the flip side of the ‘2,000-Year-Old-Man,’ where the psychiatrist tells his patient, ‘Listen to your broccoli, and your broccoli will tell you how to eat it.’ And when I first tell my students this, they look at me as if things have clearly begun to deteriorate. But it as important a concept in writing as it is in real life.
It means, of course, that when you don’t know what to do…you get quiet and try to hear that still small voice inside. It will tell you what to do. The problem is that so many of us lost access to our broccoli when we were children. When we listened to our intuition when we were small and then told the grown-ups what we believed to be true, we were often either corrected, ridiculed, or punished. God forbid that you should have your own opinions or perceptions–better to have head lice.
. . . So you may have gotten in the habit of doubting the voice that was telling you quite clearly what was really going on. It is essential that you get it back.
. . . Get your confidence and intuition back by trusting yourself, by being militantly on your own side.
. . . Get your intuition back and make space for it, when you stop the chattering of the rational mind. The rational mind doesn’t nourish you. . . Rationality squeezes out much that is rich and juicy and fascinating.
. . . If you don’t know which way to go, keep it simple. Listen to your broccoli. Maybe it will know what to do. Then, if you’ve worked in good faith for a couple of hours but cannot hear it today, have some lunch.”
Inspired by Casey’s success with the Carder Method and frustrated with my own slow progress at oil painting, I bought the Carder Method video and Color Checker tool. Below are step by step photos of my using the method to paint this still life, a brief review of the Carder Method and photos of my studio set up for working with it.
The Carder Method is designed to eliminate many of the problems that can make painting difficult. By creating an carefully lit, controlled environment, a painter can focus on learning to clearly see color and value differences while eliminating problems caused by variables such as changing light.
Click “Continue Reading” to see photos and read more….
After watching a demo of how Golden’s new Open Acrylics can be used for monoprinting (since they stay wet 10 times longer than regular acrylic paint) I was excited to give it a try. I love monoprinting but working with oil-based inks can be messy and the cleanup isn’t fun so using acrylics seemed like a great option.
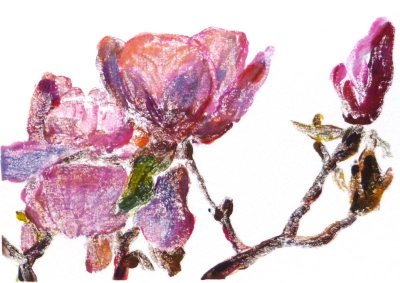
I think Golden’s Open Acrylics have a lot of promise as a painting medium, and seem to combine good features of oil and acrylic, but I wasn’t at all happy with the way they worked with monoprinting. As a matter of fact, these two preliminary painting layers (above and below) on the plexiglass plate, pleased me much more than the prints I pulled from them. I had much better luck previously when I used printing inks (see previous posts Persimmon Monoprint, Magnolia Monoprint andTurtle to Swan monoprints).
Paint on plexi plate 2
Below are steps along the way:
1. Tools and palette
2. Setting up the registration
3. First layer print
4. “Cartoon” on back of plexiglass
5. Paint on plexi
6. Plexi and print
7. Paint on plexi plate 2
8. Print above, plexi below
9. Paint on plexi plate 3
10. 1st print final
11. 2nd print final
12. 3rd print final
13. 4th print, final
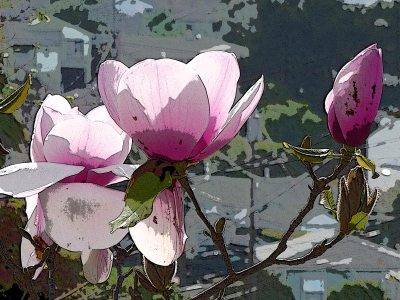
14. Original photo
15. Photo reversed and posterized in Photoshop
To read the details about the photos above, or find out how you can watch the video demo that inspired me to try this by artist Tesia Blackburn, please click Continue:


, conte on paper")


")