Categories
Animals Art business Oil Painting Published work Sketchbook Pages Urban Sketchers Watercolor

My Art in a Book, a Field Guide and a New Commission

I am happy to say that the excellent new book Urban Sketching: The Complete Guide to Techniques by Thomas Thorspecken, includes this “Urban Animals” page (above) featuring my sketches of cats. When the publisher contacted me to request the use of the images, I was delighted. I was even happier when they sent my complimentary copies of the book and I saw all the really useful information and wonderful sketches it contains.

Field Guide to San Francisco

Field Guide Cover
Field Guide Cover

Then I got an email from an art director from the San Francisco office of the national advertising agency, Ogilvy. They were moving and she was designing a “Field Guide” to the new SF neighborhood for their employees. When searching for sketches of the area she found mine, and as she looked through my blog she found sketches to illustrate most of the pages in the guide.

(This would be a good time to point out to fellow art bloggers how important it is to tag or attach categories to your images and your posts. WordPress makes it easy; the feature is a little hidden in Blogger but it really helps to find posts or images with specific content.)

In the end, they licensed 18 of my sketches for use in the printed field guide. Above are a few of the pages, brilliantly composed by the art director.

What I’m working on now

I am honored to be working on a commissioned large watercolor painting for a couple who live in Europe now, but were married in a lovely building in a Bay Area park. The wife wants to give her husband the painting for their anniversary. I visited the venue and took photos and we agreed on a composition. The painting is underway and so far is going well, but because it is large and has many details, it is keeping me very busy (and happy) in the studio.

(I’m leaving out any identifying details about the locations to make sure there’s no way her husband will find out. I know that seems unlikely, but when working on a previous commissioned painting of a house for a surprise anniversary present for the husband, their daughter found the work-in-progress painting I’d posted of her parents’ house when she Googled “Oakland Federal Building,” landed on my sketch of the building, scrolled down and the next post was her home. She was so surprised to see it she called her parents!)

Categories
Book review Flower Art Painting Published work Watercolor

“How to Paint Watercolor Flowers” (I’m in the book)

How to paint watercolor flowers: Create Your Own Masterpiece in 6 Easy Steps
My work in the book: How to Paint Watercolor Flowers

A year ago the English publisher Quarto commissioned me to do a series of paintings for a book (working title) “Must Paint Watercolor Flowers” and at last it arrived in the mail! Now named How to Paint Watercolor Flowers: Create Your Own Masterpiece in 6 Easy Steps, it features my paintings and those of 15 other artists, along with step-by-step instructions showing how we made our paintings.

The book has 160 pages and at 11″x 9.5″ is much bigger than their “Watercolor Artist’s Bible” in which I also had several paintings. It is laid out with a beautiful 8×10 photo of the flower subject on the left side and photo-illustrated step-by-step instructions for creating the finished watercolor beside it. Hard-cover spiral binding allows the book to lay open flat for artists who wish to try the techniques while painting from the photos.

I loved seeing the beautiful work of the other artists and the many ways they approached the wide variety of subjects and techniques. The flower photos are superb, with permission granted to use them for your own paintings. The book also has excellent sections on watercolor technique, color, value, and photographing your own flowers for painting.

I haven’t read all the step-by-steps, but I’m guessing that like me, few of the artists actually created their work in just the six steps that we were limited to when writing up and photographing our work. Instead the editor highlights the key techniques that were especially important to each particular painting.

If you’d like to see my work in the book with more steps than were published (on pages 41, 65, 131), you can see them on my blog (Sunny Serenade Part I, Part II, Part III; Pink Orchid, Becoming Begonias).

Disclaimer: I have no financial investment in the book; I was paid per painting for the publisher’s right to print my work, but receive no royalties or other benefit from sales of the book itself from the publisher or via Amazon links.

Categories
Flower Art Painting Plants Published work Watercolor

Becoming Begonias (third painting for the book)

Becoming Begonias, Watercolor, 9x12"

I finished my third painting for the book Must Paint Watercolor Flowers (above). This one was fun and not a struggle like the orchid painting. Since the lighting in the photo reference was flat with no obvious source of light I pretended there was one coming from the upper right and tried to exaggerate it a bit in my painting to give it some life.

Now I just have to write up my process and the materials and techniques I used for the publisher and I’ve completed my three-painting commitment. There are some really fine artists contributing to the book and I am honored to be included with them.

Below are my steps in getting to the final version.

Tracing the enlarged photo onto watercolor paper using blue Saral Transfer Paper
Tracing the photo print-out onto watercolor paper using blue Saral Transfer Paper

I printed the photo on my printer and sandwiched the Saral Transfer paper between the print and the watercolor paper.

The transfered drawing on Arches 140 lb watercolor block
The transfered drawing on Arches 140 lb watercolor

Normally I would use a much lighter line, but the publisher requests we make the drawing dark so that it photographs well. At least the blue Saral transfer erases easily with a kneaded eraser.

Painting the first layer of yellows, oranges and reds
First layer of flowers painted

I like the sort of botanical illustration look of this phase.

Beginning to paint the blues and greens in the leaves

When this brightly painted leaf dried I glazed over it with Viridian so it would stay in the background but I enjoyed these pretty colors together.

First layers of flowers and leaves painted
After adding the darks between leaves and additional glazing on leaves
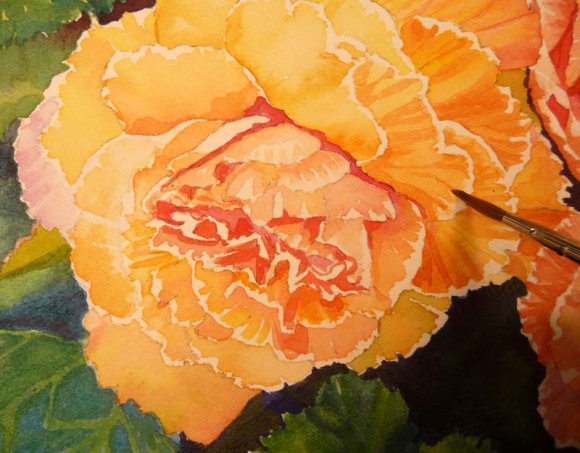
Adding details to the flowers

I had a good time glazing on the lines and shadows on the flowers. Then it was just a matter of adding a few more shadows here and there and signing my name.

Categories
Art supplies Art theory Flower Art Published work Sketchbook Pages Still Life Studio Watercolor

Refusing to Fail or Quit: It was either me or the orchid…


Orchid in watercolor #2, 12x9"


On Wednesday night I completed the last page in a sketchbook with some writing about the frustrating process I’d been through with the orchid painting. And then, as I did one last sketch of the orchid in the book (below) I realized how I might be able to actually make the painting I’d originally envisioned. It would be one I could do simply and be able to write about as the six-step process the publishers needed.

When I woke up on at 6:00 a.m. on Thanksgiving morning I realized I had to give it another try. The image above is the happy result.


Oh Oh Orchid!
My sketchbook breakthrough

Tonight my watercolor group met for dinner and a chance to share what we’ve been painting this month. When I showed them the two versions of the painting they liked both but Susie said that in the first version they looked like evil man-eating orchids, which is certainly how they felt to me. In the sketch above I thought the orchid looked like it had packed his bags and was running away, suitcases in hand. (Good riddance!)

Here is one of the MANY pages of tests and samples I made in trying to find the right pigment combinations to make this painting work.

Orchid watercolor test page

I decided the pigment that gave me the color I wanted was Winsor Newton’s Quinacridone Magenta but like most quinacridones,  it wasn’t very civilized, trying to spread everywhere.

Orchid Painting Steps

What finally worked was painting the veins first on dry paper, wetting a petal, painting cobalt blue just inside the perimeter and then dropping in the Quinacridone Magenta in the center, letting it spread and then blotting up a bit of the paint as needed.

Busby relaxing amidst orchid chaos

At least someone got to relax in the sun. When I left to make a cup of coffee Busby napped amidst the orchid chaos on my desk. You can see the original reference photo peeking out from under him, with a pile of false starts at the painting behind that.


Categories
Art theory Flower Art Painting Published work Still Life Watercolor

Painting for the book: “Must Paint Watercolor Flowers” – Part II

Starting orange flowers; softening an edge

Continuing on from Part I, here is a close up as I began to paint the yellow and orange flowers. For the first layer of this flower I painted the darker sections and then used clear water in a damp brush to pull/feather the color out into the flower so it didn’t make a hard edge.

Yellow underpainting of some flowers
Yellow underpainting (click to enlarge)

For the three large zinnias, I outlined all the petals with Holbein Cadmium Yellow Light. Then I brushed a ring of clear water around the center of each of those flowers and painted a narrower ring of yellow inside that so the paint would softly spread in the water to not quite the edge of the water, producing a soft edge. When that dried I painted the flower’s very dark center with a mixture of Winsor Newton (WN) Burnt Sienna and Winsor Violet. Then I painted the gold ring between them with WN Cadmium Orange mixed with Daniel Smith (DS) New Gamboge.

Painting one petal at a time

I began applying mixtures of WN Cadmium Orange, WN Permanent Rose and DS New Gamboge to one petal at a time while avoiding painting over the yellow outlines on the petals,. You can see the juicy puddle of color I like to put down. I’m careful to let it dry without shifting the tilt of the paper to avoid backwashes.

Orange flowers completed

I worked all over the paper, turning the painting sideways and upside down instead of reaching across, to complete all of the yellow and orange flowers. Some of them will get touch-ups before the painting is completely finished.

Next time: more greens, the dark background, and the finished painting. Meanwhile, I’ve been assigned the next painting to do: a lovely orchid which I will approach in a completely different manner.

Categories
Art supplies Art theory Drawing Flower Art Painting Published work Sketchbook Pages Still Life Watercolor

Painting for the book: “Must Paint Watercolor Flowers” – Part I

Rehearsal: Sketchbook pages

I was given permission to post some of my work on the upcoming book, “Must Paint Watercolor Flowers” (Quarto Publishers, London) for which I’ve been commissioned to paint three floral watercolors.  The painting is the easy part; taking the photos, correcting them in Photoshop, and writing about each of the steps takes much more time and isn’t nearly as much as fun. I thought I’d break this into a few posts so they won’t be too long.

My first step after being given my choice from a couple dozen excellent photos (which I’m not permitted to post) was to do some rehearsals in my sketchbook. I used several pages to experiment with how I wanted to approach the metal pitcher,  mixing colors for the leaves, the buds and the yellow-green flowers (above). Then I experimented with color mixtures for the orange flowers and the large amount of darks (below — combinations of Winsor Green and Alizarin Crimson, Ultramarine Blue and Burnt Sienna, Sap Green and Sepia, Winsor Green and Winsor Violet).

Rehearsal - Sketchbook p. 2

Next step was to transfer the photo to my watercolor paper. Initially I was going to make the painting small enough to fit on my scanner but decided to use the maximum size the publisher allowed since it was such a complex painting.  I chose a 12 x 16″ Arches 140 lb. cold press watercolor block  (block is easier to set up for photographing). If I’d been given more time and/or if the photo wasn’t so complex, I probably would have transferred the image by drawing freehand or using a “gridding up” method but with a two-week deadline I used a quicker method.

Transferring the photo to watercolor paper

I enlarged the photo in Photoshop and printed it in sections (before figuring out I could have more easily used my copier to do the same) and taped them together. Then I placed a sheet of Saral Transfer Paper on top of my watercolor paper and laid the enlarged print on top of the Saral. Using a ballpoint pen, I traced over the shapes of the flowers, leaves, stems and shadows which transferred graphite lines from the Saral paper onto the watercolor paper.

Cleaning up the drawing

See what I mean about how complicated the image is! I’d left too much of an overlap on the tiled together enlarged photo and some areas didn’t get a good transfer so had to freehand some of the drawing, clean up some lines and darken others. This is my new favorite mechanical pencil, the Papermate PhD Ultra.

Masking near the pitcher

I wanted to paint the pitcher wet-into-wet and so I applied Winsor and Newton Colourless Art Masking Fluid to some of the shapes around and projecting into the pitcher to make it easier to paint wet into wet more freely. I used a cheap disposable brush to avoid messing up my good ones. I prefer Cheap Joes Golden Fleece rounds for watercolor and even though they aren’t expensive, I don’t want to ruin them with masking fluid.

Pitcher painted, removing masking fluid
Detail: Pitcher painted, removing masking fluid

I like pulling off the mask with the rubber cement pick up tool. I think it’s made out of the same stuff Vibram shoe soles are made from. The pitcher and the table have had their first washes. Next step is starting on the flowers and that will be in the next post.

Categories
Flower Art Painting Published work Sketchbook Pages Still Life Watercolor

My art in the book!

I'm in the book!

The Watercolor Flower Artist’s Bible: An essential reference for the practicing artist (link to Amazon for more info)

Last December I received an invitation from an editor at Quarto Publishing in London to submit photos of my watercolor flower paintings for publication in an upcoming book. At first I ignored the message because I assumed it was the kind of spam email I get regularly inviting the artist [to pay] to be in a show or a book. Just before the submission deadline I did some investigation and discovered they are a good publisher and that I actually owned another of their books. I submitted files of my photos and scans of five paintings.

That editor’s editor approved the photos for inclusion and they asked me to write about my process, goals, focus, techniques, etc. for each painting which I did. Then I waited. I was promised only a copy of the book and good publicity in exchange for their right to publish the art in their book.

I got the book this week and was so excited! Not only did they do a really nice job with my artwork and the descriptions, but it’s a really good and comprehensive book on flower painting in watercolor. The most exciting part for me is that I’m sharing the pages of a book with some truly amazing artists, including one of my favorites, Lucy Willis, who has published several wonderful books (that I own and treasure) on watercolor painting, seeing and painting light, and travel painting.

My artwork can be found on pages 72, 85, 86, 101, and 152. Here are my chunks of those pages:

My tulips in the Watercolor Flower Artist's Bible
Larger

My rose in the Watercolor Flower Artist's Bible
Larger

My rose and bottle in the Watercolor Flower Artist's Bible
Larger

My poppies in the Watercolor Flower Artist's Bible
Larger

My irises in the Watercolor Flower Artist's Bible
Larger