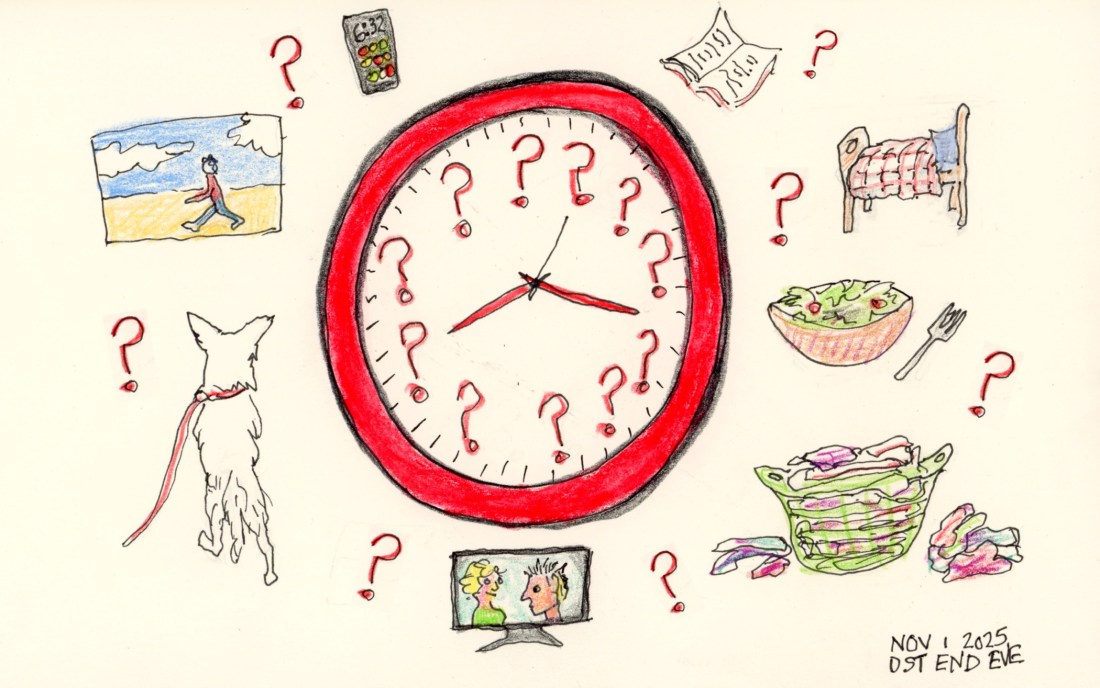
Daylight Savings Eve, 5×8” Ink, Neocolor II, Inktense pencils
The end of Daylight Savings is my favorite day of the year! It’s like Christmas Eve—I love knowing I get a free hour to use as a “Do-Over” sometime during the day, after I’ve fallen into a rabbit hole of one sort or another.
And I fall into a lot of rabbit holes, thanks to ADHD and its “time blindness” feature.
Like today, I was about to do a Peloton cycling class but found myself finally clearing out all the bags and bins of lockdown-era flours for bread making instead.
Then I moved on to the containers of dried beans and peas I’ll never cook. I posted the beans on my local Buy Nothing group. Hopefully someone who is still friends with legumes can enjoy some soup making.
I finally did the fun cycling class, but so late that lunch after was at 4:00 pm. And finally got in the studio and drew this to celebrate Daylight Savings End Eve.
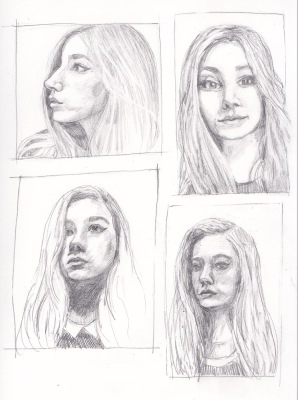
Sketching from Sktchy App photos (I explained it here) is a great warmup exercise and opportunity to practice drawing a wide variety of faces and expressions. Each week they offer a Weekend Art Exploration (#WAX) challenge and 3 of the drawings marked in the collage below were for WAX. All are in a 12×9″ sketchbook.
Collage of sketches and inspiration photos from Sktchy. (Click on image two times to enlarge.)
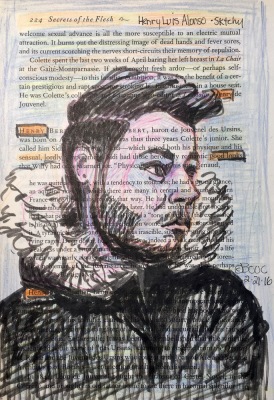
The challenge marked in the top row was to draw on text; mine is on a page of “Secrets of the Flesh: The Life of Collette.” The challenge in row two was to show your tools used to create the art so I put my colored pencils in front of “Crazy Eyes,” as she titled her photo. The bottom row challenge was to use the magic of art to transform a photo into something else (I combined Tweety Bird with the girl making a bird face). The last sketch above is from a photo I uploaded for others to draw. I did a better job on Millie than me.
Below are larger versions of a few from this batch (click to see larger):
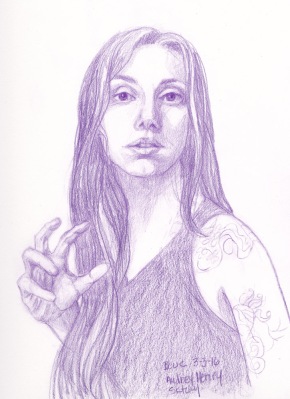
Audrey Henry, Colored Pencil
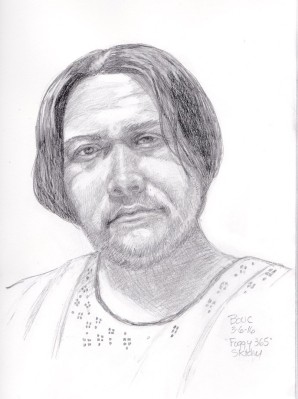
Artist known as “Foggy 365” in the hospital, graphite and conte pencil
Henry Luis Alonso on Secrets of the Flesh
4 views of “Moon Child Luna 2” in graphite
This weekend the challenge is to draw from the same photo twice, once with each hand. Wish me luck! I don’t think my left hand knows how to do anything except type.
Cathy Sketching at Bateau Ivre, Sepia pen and watercolor, 8x5"
We had a wonderful Tuesday evening sketching and dining at Le Bateau Ivre (The Drunken Boat) in Berkeley. The ambiance and food are fantastic. We sat in the dining room with lovely brick walls and a fireplace. When we sketched there last year we sat in the café area which is equally charming.
International Sketchcrawl 35is Saturday, April 21!
Here is a link to the Sketchcrawl website where you can find out if there is a group sketching near you (or start a location yourself).
San Francisco looks to be a particularly juicy sketchcrawl, starting in North Beach and ending at a free Burlesque Queens sketching marathon at a hotel at Fisherman’s Wharf, hosted by Dr. Sketchy’s Anti-Art School. The burlesque performers are in town for the Tease-O-Rama, a “showcase and convention dedicated to the thriving neo-burlesque revival.”
Unfinished sketch of random stuff on table with bits of business card
When I was a kid I had a sock puppet that looked like this so when I saw this fabric at the store I couldn’t resist. I used a piece of it to cover a cushion on a stool about 5 years ago and then put the rest on the shelf. I needed to bind a new journal right away and was too lazy to go shopping for book cloth or to make my own. Hence off the shelf and onto the book!
Monkey Business Journal inside
For the end papers I used some lovely warm grey paper a friend left at my house from a family history book-making project I was helping her with. This was the first time I could use my case-bound journal making instructions all the way through without needing to revise them and it went really quickly.
Monkey business journal
I’ve actually been using this journal already for a couple of weeks and writing this post prompted me to name the journal which I hadn’t yet done. Calling it “Monkey Business” will help me to lighten up as I use it, to get more playful and fool around and let go of “right” and “good” which always trip me up when I get in that judgmental place when I’m drawing, instead of just enjoying the act of looking and sketching what I see.
And since it’s red flannel it’s warm and cozy–perfect for fall sketching.
Foil bag of potato chips reflecting on red cloth, ink & watercolor, 5x7"
When my friend Mindy sent me a fun little gift box of potato chips (which were invented in her town, Saratoga Springs, in 1853–read funny history here), I was smitten by the cute box (photo below). Then I opened the box, saw the foil inner pouch and had to try to draw it (sketch above, on a red cloth).
Box of Saratoga Springs Chips
The box was charming, a replica of their original packaging from 1853. I remembered seeing journals created from packaging on the fabulous Make a Book a Day blog where Donna Meyer binds and posts a new book almost every day. In August she did a whole series of recycled packaging books, from KitKats and Snowballs to root beer books.
When I finished the journal above I decorated the cover and sketched a self-portrait as I do for the last page of each sketchbook. This journal is called Harlequin (theoretically because of the multi-colored cover–the back is turquoise, the front is lavender with black spine covering). I know the word “harlequin” has nothing to do with patching together leftover bits of bookcloth to make a cover, but I let my sketchbooks name themselves and this one wanted to be called Harlequin.
I used (expensive, oil-based) Sharpie Paint markers for the color on the cover but they didn’t show up at all on the black and required several layers on the lavender. Despite the art store clerk’s recommendation, Sharpie Paint markers are not meant to be used on fabric. Annoyed with the markers, I switched to a gold gel pen for the words and lines.
End of sketchbook self portraits, ink & watercolor
These are the two journal-ending self-portraits sketched on the last spread of the book above. I don’t know why I refuse to try for accuracy when I sketch self-portraits. I just draw and see what happens instead. The first one (on the left) feels like me, even though the proportions are wrong. The one on the right is wrong in so many ways I might as well have been drawing a completely different person.
Newly bound journal
I’d planned to experiment with dying my own bookcloth for the new journal like Shirley does, but when I went to the store to get the Wonder-Under (iron-on stuff to fuse fabric to paper backing) I fell for this linen fabric and used it instead. My adventure on the previous journal was figuring out how to patch the bookcloth together. This one was figuring out how to fuse the fabric to the Thai Mulberry paper per Shirley’s instructions (the hardest part was figuring out how to peel the almost invisible paper backing off the Wonder-Under). Maybe next time I’ll dye fabric.
I’ve also updated my file How to Bind a Watercolor Journal (as I do each time I bind a journal and learn more) and it’s available to download on the Comments & Resources page of my website, JanaBouc.com.
Hydrangeas Attempt #2; Painted directly without drawing and ink lines added after finishing attempt #3
During days of dismay at my disappointingly dismal drawing dexterity I determined to draw ’til I improved. But I was under the influence of migraine medicine which fixed the headache but left me drowsy. I actually fell asleep at the drawing table, dropped my brush on the page which woke me up, and had to go lie down for a spell between drawings.
Hydrangeas Attempt #1; drawn in ink, painted with ugly dark background which was then sponged off and a bit more paint added
My hydrangeas are bursting with vibrant blooms so I made them my subject. The first attempt got off to a decent start until I painted a nearly black background, probably due to my really dark mood and being too doped up to know when to stop.
I couldn’t stand the way it looked, so before scanning tonight took a soft, wet sponge and washed off the dark background. Then I dropped a little more color into the wet background.
Hydrangeas Attempt #3, ink & watercolor
I had the most fun with this last attempt, where I drew and painted more loosely, trying to capture the flavor and personality of the flowers.
On the left is the new journal I bound for International Fake Journal Month and on the right is my next all purpose journal that I bound with Legion Multimedia 140 pound watercolor paper.
Since it had been a few months since my epic journal binding learning experience, I had to replay many of the videos and look at my notes to figure things out. And I made a bunch of new mistakes to learn from.
I have one big, confusing question. (UPDATE: See Comments for answer from Roz and note from Shirley) When I punched sewing holes I followed Roz’s video, along with Shirley’s tip to use a phone book to support the signatures. I punched four holes just like Roz did in her video demo, instead of the five I punched last time. But when it was time to sew the signatures together I couldn’t figure out how an even number of holes could work. When you have an odd number of holes and you start on the outside of the folded signature you always end up on the outside at the end of each row so you can attach each signature to the next. But with four, if you start on the outside you end on the inside. I’m guessing Roz was preparing a different sort of book.
Fortunately I had torn down extra sheets, thinking I’d bind two journals but I put aside the set I’d punched with four holes and punched five holes in the second set. Either I’ll find out how to bind with four holes or I’ll go back and make one more hole in each signature before binding them.
I also used Shirley’s tip to glue up the binding board and then place it down on the book cloth instead of putting glue all over the cloth and that was sooo much easier.
Some new mistakes I’ve learned from this time:
MEASURE TWICE, CUT ONCE! (or in my case measure 3 times just to be sure).
After gluing down the board pieces to the book cloth, I should have burnished them with the bone folder to ensure a consistently strong bond (a few small wrinkles showed up in the cover where it didn’t bond 100%).
Don’t make the book so thick; use fewer signatures so it is lighter and less tiring to hold when sketching standing up.
When you use “self-endpapers” that doesn’t mean adding yet another folded sheet, making the book even thicker. It means just gluing the book block directly to the covers (I think–correct me if I’m wrong). I had picked an ancient map print to use as end papers in the green journal but decided I didn’t like it at the last minute. I liked Shirley’s idea of just using colored drawing paper instead.
Make the sewing thread long enough so you don’t have to join it in the middle (thus having to once again struggle with knot-tying from diagrams that are totally confusing).
Don’t use white thread and white headband ribbons on black books.
Now I’m coming to the end of my journal bound with 90 lb Arches cold press paper. I will be sad to put “The Mutt” as I named it, on the shelf, as it has become a trusted friend and companion. And I really came to enjoy the paper, once I started using my Lamy Safari fountain pen to draw with.
Soon I’ll be getting to know a new journal, with new paper and new possibilities. I think I shall name it Froggie, given its green color, warts, and all. Someday maybe I’ll make a journal that is elegant and give it a posh name but for now, mutts and toads R Us.
And I’ll write more about the black/brown journal in April when I start using it for International Fake Journal Month.
When I saw this woman reading on BART I had to draw her. She seemed to express the essence of dignity to me. She was carefully dressed and groomed, all in white, grey and black, with her hair covered in a white crocheted net and that wrapped with a perfectly ironed bandana, tied in a tiny bow in front.
This was my first drawing in my new Fabriano Venezia sketchbook that Roz had tested and praised and that I bought in a couple of sizes from Wet Paint. This is in the 9×6″ size. I left the first page blank to serve as a title page/table of contents later and did this drawing on the next page. I was totally in love with the sketchbook, writing a little rave review on the page of this first sketch about how wonderfully smooth and thick the paper was, and how nicely it worked with the Micron Pigma .01.
I was a little concerned about how much larger and heavier to carry around it is than the Moleskine watercolor notebooks I’ve been using, but thought it would be worth it. BUT when I tried to scan my drawing and the book didn’t quite fit on the scanner, cropping off part of the image, and the middle seam caused half the image to blur and have a dark shadow, no matter what I tried.
Then tonight I tried adding a watered down ink wash to her jacket, which had been black. The paper acted very strangely, not at all like I’d expected. I knew it wasn’t watercolor paper, and thus wasn’t sized, but now I’m now worried how these books will react with watercolor. I guess I’ll find out soon.
Here’s the same image with the ink wash that went all splotchy.
Less Dignity with ink wash
She was so carefully groomed, with everything perfectly ironed and smooth and now she looks much less dignified with her splotchy jacket. I don’t think the ink wash added anything positive to the drawing, do you? And I don’t think adding more ink to try to make it smoother or darker would be a good thing either.
I saved two rose buds to paint when I pruned my roses last week (in case winter ever comes to the San Francisco Bay Area—it’s been ridiculously hot and sunny). By the time I could get back in the studio, one bud had opened and my order of M. Graham and Schmincke gouache arrived. Although I planned to test the new gouache by making color charts first, I knew the roses wouldn’t hold up much longer. Also included in my art supply order was a new Rotring Art Pen.
I tried out the gouache and pen in the sketch above. I also wrote a quickie review of the Rotring Art Pen and offer some technical information about gouache by experts on the subject. If you’d like to know more about gouache or the pen, please click the “Continue reading” link below.