Categories
Faces Oil Painting Painting People Self Portrait Studio

Alla Prima Self-Portrait in Oil with Steps in Progress

Self-Portrait, Zorn Palette, oil on Mylar, 12x9 inches
Self-Portrait, Zorn Palette, oil on Mylar, 12×9 inches

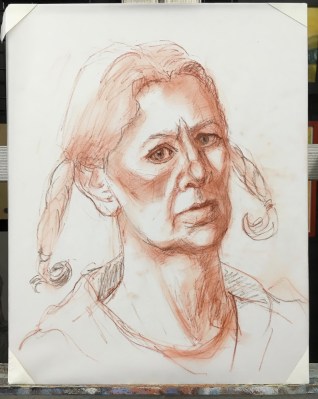
I might look grumpy or serious from concentrating, a little cross-eyed (eyes drawn too close together), big-nosed and scrawny, but I’m really happy with this painting because it was fun to do! The hardest part was lighting my face without blinding myself with the glare.

Below you can see the setup I used in the studio, with the giant mirror I got for $10 (!) at Home Depot; it was half priced and had a few scratches so they took off another $5. I had a hard time supporting the mirror so that it was tall enough to see myself. Finally I found a solution: propped it up on an open drawer, held in place with two bungee cords wrapped around the studio chest of drawers.

Inspired by Myriam Yee (be sure to check out her amazing series of Zorn palette self-portraits here), I used the “Zorn” limited palette of Ivory Black, Cadmium Red Medium, Yellow Ochre and Titanium White. Myriam uses Williamsburg Cold Black instead of Ivory Black, which has some Ultramarine Blue mixed in and provides a wider range of colors. I bought a tube and am experimenting with it now.

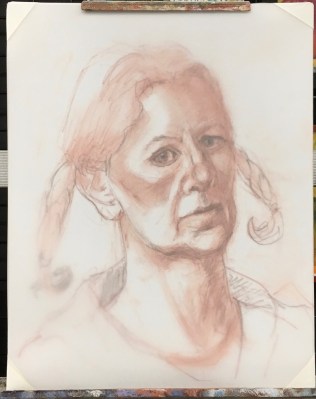
I painted on Dura-Lar Matte Film again but this time (see previous post) I did the drawing on one sheet and then imposed a second sheet over it to paint on. This way, if I wanted to try a second painting of the same drawing or just want to save the drawing I still have it.

Categories
Drawing Faces Figure Drawing People Portrait Studio

Figure and Portrait Drawings

Figure drawing wall in studio

I just made a big leap in my understanding of figure and portrait drawing so wanted to share previous sketches and paintings before the new work. Above is a photo of the “figure drawing wall” in my studio. I’d covered this wall with black non-fade bulletin board paper to avoid reflected light when I’m at my easel (that stands just to the right of this photo). Then I hung black metal grid panels that I got super cheap on Craigslist and use little magnets to stick the drawings to the grid wall. Now it’s easy to add, move or replace drawings with better ones as my skill improves and I can hang framed paintings from it with grid wall picture hooks.

Below are assorted figure and portrait drawings from past Friday Figure Drawing sessions. Click on any image to go to slide-viewing mode and click through them using the arrows on each side.

Categories
Art supplies Lighting Oil Painting Still Life

Montessori Pink Tower and Turnips (plus great new studio lights)

Montessori Pink Tower and Turnips, oil on linen panel, 10x10 inches
Montessori Pink Tower and Turnips, oil on linen panel, 10×10 inches

This painting was inspired by my neighbor’s childhood Montessori Pink Tower blocks arranged like a little cityscape on his coffee table. I found the blocks irresistible and had to paint them. The turnips I’d bought to cook for dinner seemed like a perfect addition (I know, I’m weird, right?) The painting is available on my Daily Paintworks gallery here.

If you’d like to see my full notes with goals and outcomes for each painting session, you can open this small PDF file.  Life intervened between sessions which made painting from life difficult as you can see in the photos below taken at the beginning and end of the painting process: the turnips had started to sprout and wrinkle.

Categories
Animals Ink and watercolor wash Sketchbook Pages Studio

EDiM 5 and 7 (Hobby: Millie and Microwave)

EDiM 5 Hobby (Millie), ink on Stonehenge brown paper glued in Moleskine, 5x7 in
EDiM 5 Hobby (Millie), black ink and white Sharpie on Stonehenge brown paper glued in Moleskine, 5×7 in

I filled pages of my sketchbook trying to draw Millie from life but never got more than 1/3 a dog before she moved. So I pasted some brown Stonehenge paper over a couple of the dog scribble pages and then drew this one from a photo. She’s extra elegantly long in my drawing and seems to be prancing through the air (I forgot to add some shadows or a part of her bed so you could tell she was relaxing lying down.

EDiM7-Microwave in the studio beside the sink, ink and watercolor 5x7 in
EDiM7-Microwave in the studio beside the sink, ink and watercolor 5×7 in

I inherited this microwave from my son, left behind when I converted the grease monkey garage into my studio. When I use it to heat water for tea in the winter I just have to remember that if I have both electric heaters on, all the lights and the stereo going and a hair dryer blow-drying a watercolor, there’s a good chance I will shortly be sitting in the dark until I visit the circuit breaker box and flip the switch.

Categories
Ink and watercolor wash Sketchbook Pages Studio

Joy, Socks and Flat File Workstation

Something That Brings You Joy and Draw Your Socks, ink & watercolor, 8x11
Something That Brings You Joy and Draw Your Socks, ink & watercolor, 8×11

“Draw Something That Brings You Joy” was the cue for May 3. The first thing I thought of was my new (to me) flat file work station. I already had one set of files and was using them as a seating area, covered by a board, foam pad and quilt. But I decided I needed a  standing work station more than a lounging area in the studio.

Months ago I started watching Craigslist for another set. I finally found one in my sister’s neighborhood and my brother-in-law was willing to help me get them home, build a sturdy base for them and set them up, with the white melamine-covered board now a table top. Yay!

Day 4 was “Draw Your Socks” but it could have also been another “something that brings you joy” day, since my wonderful Smartwool Socks bring me and my feet much joy. Especially these cute, funny ones that look like there are two or three socks in one and have blue polka dots, flowers and stripes on them.

Categories
Lighting Oil Painting Still Life Studio

From Grisaille to Color: Painting a Colored Block Landscape in Oils

Block Landscape, final painting, 12x16, oil on panel
Block Landscape, final painting, 12×16, oil on panel

I wanted to learn how to get from a grisaille underpainting to a full color painting after I did the Frankie Flathead monochrome study. So I decided to set up some colored blocks as if they were a landscape, and paint them in layers, starting with a grisaille, trying to find a method that worked for me.

Above is the final painting and below is the step-by-step process that I followed.

Categories
Art supplies Mexico Oil Painting Painting Product Review Studio

Painting Sold and Varnished: A Review and How-To with New Pre-Mixed Gamvar Varnish (for oils, acrylics, alkyds)

San Miguel de Allende, Mexico, 9"x12, oil on panel
San Miguel de Allende, Mexico, 9″x12, oil on panel

I just sold the painting above and wanted to varnish it with a protective layer before shipping. I’ve been afraid to try traditional damar-based varnish which is prone to drips, bubbles and yellowing. I knew that somehow at least one cat hair would embed itself. So in the past I used a spray-on varnish (which has its own disadvantagse) or just shipped sold paintings without varnishing.

The ORIGINAL 2-part Gamvar Picture Varnish
The ORIGINAL 2-part Gamvar

I’d read that Gamblin’s Gamvar synthetic varnish was easier to use and very archival, developed based on research at the National Gallery of Art. But it came as a two-part kit that you have to gently mix, every hour over eight hours. For me, that is a recipe for failure. I knew I’d get distracted and miss an hour just like when I make a cup of tea, forget about it, and hours later have to throw it out and start over.

New Gamvar Pre-Mixed Picture Varnish

Now it comes Pre-Mixed! Gamblin just released a pre-mixed version of Gamvar in a 2 oz. bottle containing enough varnish to cover 40 square feet. I called Gamblin with some questions that I didn’t see answered on their website. Their technical support people were on other calls so the operator connected me to their president who cheerfully answered my questions. You can’t beat that for customer service!

My questions and his answers were:

Categories
Art supplies Interiors Photos Studio

My New Remodeled Art Studio Tour (at last!)

Looking out to the deck
View from inside looking out to the deck

Hi! Come on in and let me show you around my new studio. The concept for the studio began in 2000 when I bought my cottage, a 1940s duplex. I planned to use the front unit as my home and the rear unit as my studio while still working at my “day job.” When the time came that I could leave to paint full time, I planned to rent out the back apartment for extra income and convert the 400 square foot garage to my studio.

The rear unit studio was wonderful and I spent many happy hours painting and teaching there. But the new studio is even better! Even though it’s near my house, it’s completely separate so the distractions of laundry, dishes and computer; the nagging of cats for dinner; email and phone calls disappear and painting time flows uninterrupted.

Before the tour, here are “before” pictures of its former life as a grease-monkey garage where my son worked on cars.

The 1970 Firebird Cody was restoring in my garage
The garage before it was transformed and the 1970 Firebird Cody was (still is) restoring

The bare garage walls had 40 years of grease and grime and Bondo dust and the concrete floor was badly stained and cracked. The only electricity came in from an extension cord.

Huge Chevy engine and garage full of tools (and grease)
Huge engine under construction
Backyard before door and deck

The only entrance was the heavy and awkward sliding barn doors on the driveway side of the garage. Now I’ve transformed the old garage from a place for pursuing a passion for pistons to a passion for paint.

Deck and door to studio

I added the doors and deck (though the contractor’s mistakes led to it not being a two-steps up raised deck as planned–but it is level unlike how it seems in the photo). The high-maintenance funky grass is gone, replaced by gold fines which makes it feel like a beach. Now it’s a great place to set up a still life and paint outdoors and I love eating lunch and reading out here too.

Here is a 6 minute video tour, and below that, pictures with more detail.

In the video and photos below, you can see that I love good art tools. I have collected this studio equipment and supplies over many years of painting. Much of it I bought secondhand or long ago. 

Categories
Ink and watercolor wash Painting Sketchbook Pages Still Life Studio

Last Sketches From My Old Studio

Art supplies and tea on right, ink & watercolor, 4x6"
Art supplies and tea on right side of table & sketchbook, ink & watercolor, 4x6"

These are some of my special drawing table items: my cigar box supply holder, my watercolor brushes and pens, and a coaster under my cup sent to me by illustrator Mick Wiggins in response to a fan letter I sent him about the series of posters he designed for BART, our subway system.

Lamp and squash on right side of table & sketchbook, ink & watercolor, 4x6"

And here’s the left side of the same drawing table with my funky little table lamp for lighting still lifes, the wall grid for hanging supplies with paper towel holder, and the base of two combo lamps at the back — and some squash for sketching that are still (a month later) awaiting cooking.

Table still life, full spread in sketchbook, 4x12"

Here’s the full spread as it appears in the sketchbook. I drew the cup twice because I wanted to practice ellipses. I feel a little sad looking at the pictures because that much loved studio is no more. It’s under construction to become a studio apartment instead.

My new studio is wonderful and almost done. Just need to move in my flat files and painting/canvas storage rack, which hopefully will get done this weekend. Then just a little more work on house, apartment and studio and I’ll be able to get back to my happy rut of living to draw and paint instead of living in topsy-turvy world

Categories
Art supplies Drawing Landscape Oil Painting Outdoors/Landscape Painting Studio

Painting Pt. Bonita Part 2: Oils and Oil Pastels

Point Bonita #3, Oil on Gessobord Panel, 12x9"

After I did the watercolors I posted yesterday, I set up the sketch, the watercolor and my iPad displaying the photo on the table beside my easel and painted the scene once again, this time with oil paint. After a month or two of being totally frustrated with oil painting, trashing everything I made and about ready to give it up, suddenly painting was easy and I was loving it!

Point Bonita Painting set up in studio

The entire painting worked like a charm except the foreground mount of dirt and ice plant which was the last thing I painted and which I did over and over. It kept trying to call too much attention to itself. I think I finally successfully muted that foreground while still keeping the light on it.

Then I was looking at some delightfully free and vibrant oil pastel work on Aletha Kuschan’s blog which inspired me to try the scene in oil pastels too. I know nothing about oil pastels so I quickly read a few how-to’s on the web and dug in.

BUT before I show you the drawing, I have to say that I made a fatal misstep: I chose a sheet of the totally wrong paper to work on. Instead of starting small on a sheet of white or blue pastel paper, I chose a large sheet of brown Stonehenge drawing paper. What was I thinking? Brown under a turquoise sea?

Point Bonita #4, Oil pastel on Stonehenge paper, 17x13"

It was impossible to cover all the brown paper because even though the oil pastels got really thick in some areas—so thick that no more could be applied—in other spots they just wouldn’t cover.

Although my Holbein Oil Pastels are very old, purchased for a small project I did more than 20 years ago, they were still in good shape. But I didn’t have the right colors, and I had trouble blending. I didn’t have blending stumps, didn’t want to use my fingers and was wearing gloves which didn’t work. I tried a paper towel but it just smeared and left paper towel lint.

Compared to paint, oil pastels seems like a lot of extra work, having to fill in so much area by scribbling over and over. And it was messy; my gloves and the pastels got dirty from colors transferring onto them.

But maybe if I knew what I was doing, or had used the right paper it would have been easier or less messy? (Not to say that oil painting isn’t messy! Everything I own has paint on it!) I like the look of oil pastels done well so I’ll try another experiment with them. But on the right paper this time! Any tips?