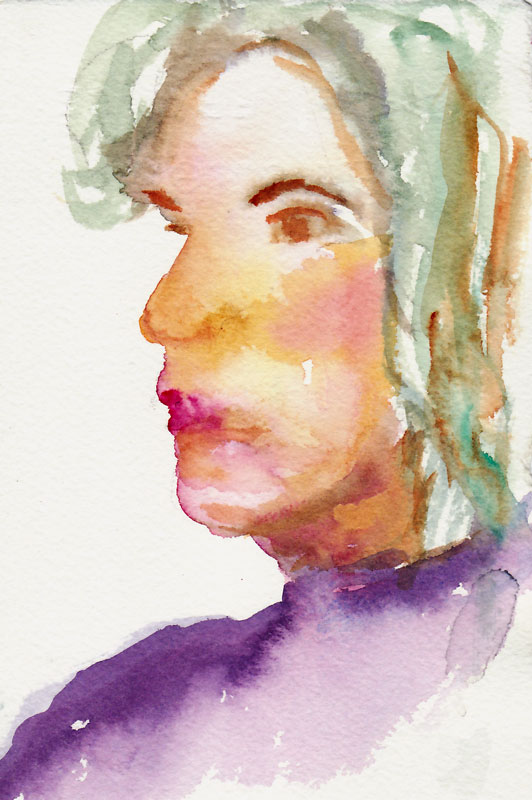
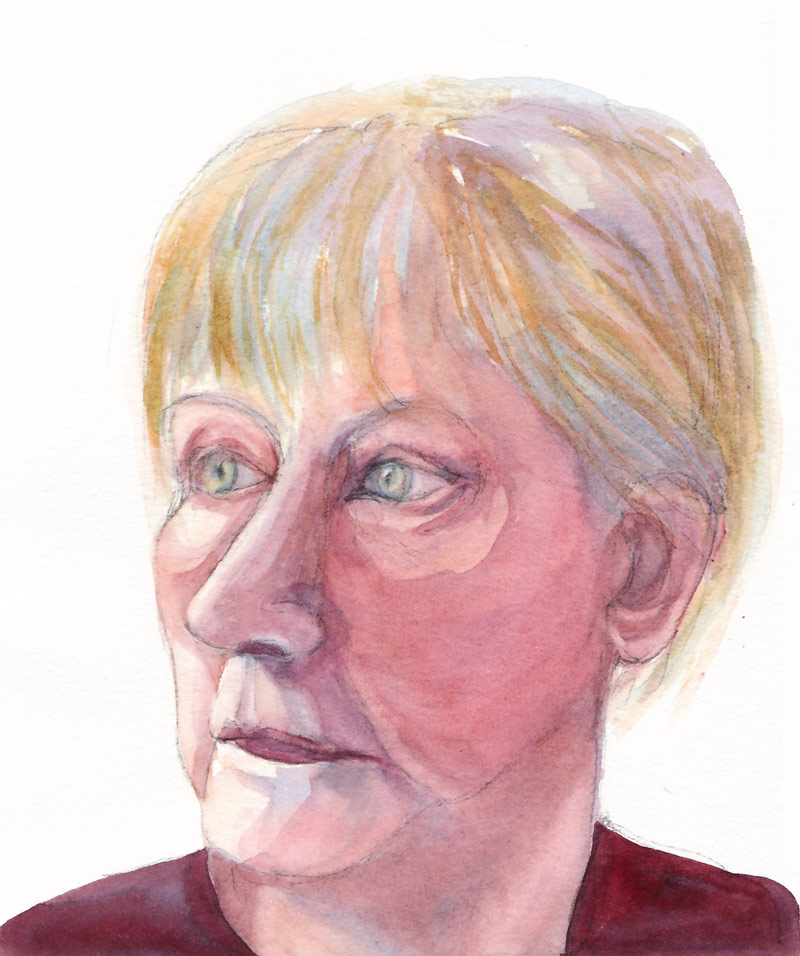
I met a very quirky 76 year-old woman artist who has made her home, her car and her self into a wonderful, crazy work of art. I’ll share more about her next time, but today wanted to post this self-portrat she inspired.
I’d been feeling discouraged about oil painting after doing a terrible plein air painting on Saturday but meeting that woman on my walk today, I was inspired to braid my hair and decorate myself with make up and do a self portrait in oils.
I started by setting up a mirror but found it awkward to paint while having to keep looking in a mirror to my right and making the same face. So I took photos, shooting into the mirror, and then displayed the best one on my computer monitor and worked from that. Here’s the photo I used:
Reference photo of me
I started by drawing with white pastel pencil on an already toned canvas (actually a reused canvas: the first painting I did when I picked up oils a year or so ago — a portrait of my sister that was so terrible that I scraped it and covered it in a warm brown oil paint to be used again). I like sketching with a pastel pencil because it rubs off easily from a primed canvas and disappears into the oil paint without streaking or smearing.
Pastel drawing on toned canvas
Then I photographed the drawing bove and pasted the image as another layer in Photoshop on top of the reference photo, adjusting the new layer to 60% opacity. That allowed me to see where my drawing was off and make the adjustments on my canvas. You can see in the overlay below that I’d missed in many places, despite my attempt at accuracy.
Drawing overlapping photo
I’ve learned the hard way that an incorrect drawing just leads to a bad painting. I could have just enlarged the photo and traced it right onto my canvas, but I love drawing and wanted the challenge of drawing myself somewhat accurately. I think the final painting does look a bit like me and it was definitely fun to do.
I’m going to wear my hair like this to work tomorrow. And I’m not going to give up oils.
I was invited to participate in a two-person show for the month of September and the reception is Friday night September 12, from 7:00 to 9:00 P.M. I love the paintings of the other artist, Lin Salamo. The opening coincides with the festive monthly “art walk” called the Stockton Stroll (the gallery is on Stockton Avenue) but the show is up for the rest of the month.
If you’re in the neighborhood stop by for a sip of wine and say Hi!
Paintings by Jana Bouc and Lin Salamo
Fingado Art Gallery
El Cerrito Landscapes ~ September 4-27, 2008
Watercolors by Jana Bouc and
Acrylic paintings by Lin Salamo
RECEPTION
DATE: Friday, September 12, 2008
TIME: 7:00 – 9:00 p.m.
LOCATION: 7025 Stockton Ave., El Cerrito, CA 94530
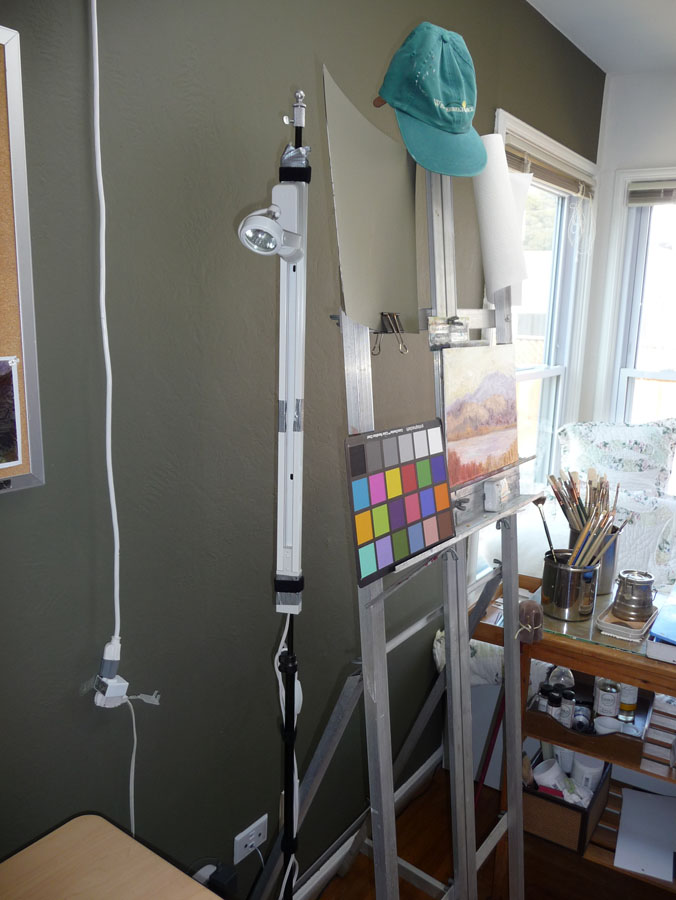
I’ve made some improvements to lighting and comfort in my studio and wanted to share what I’ve learned in the process. In the picture below you can see some of the changes from my previous post about reorganizing the studio. These include the floor mat, the wall paint, and a still-life lighting setup.
This post could also be called, “What I Bought Myself for My Birthday” as these goodies were all birthday presents to myself. (Click the images to enlarge.)
Studio with new cushy floor mat, lighting and dark painted wall
FLOOR MAT
The floor mat pictured above makes a huge difference in comfort. I got the idea at my hairdressers when I wondered how she stands all day. She pointed out her floor mat and when I felt how cushy it was, I had to get one. I work standing at a computer or at the easel much of the time. Without a cushion my feet tend to hurt by the end of the day. I tend to sit until my back hurts and then stand until my feet hurt and then switch agin. The mat makes it comfortable to stand comfortably for much longer.
WALL PAINT
I painted the wall behind my easel and desk Benjamin Moore “1490 Country Life” using their new Aura line of which is nearly odor free and covers in one coat. I’d noticed studio walls painted this color in many of the painting videos I’ve watched. Finally one of the artists actually specified that this 1490 color was especially popular with portrait artists for their studios because of how the color sets off skin.
But it also reduces the glare off of the previously white wall I was getting from my overhead light and helps to cut unwanted bounced light and the resulting double shadows on a still life that I’m lighting with a strong directional light (more about that in a minute).
I still have to wear the hat you see hanging on the ease—the overhead fixture does a beautiful job of lighting a canvas without reflection, but with a relatively low ceiling it’s pretty bright on the eyes.
STORAGE
Below is the wonderful canvas and supply rack that my next door neighbor built for me.
Canvas storage rack in closet
It can be free standing but was built to fit inside this closet. The four sections on the far left hold already painted panels and for now, the rest hold panels and canvases ready to paint. The structure is seriously overbuilt due to a slight miscommunication. We speak in a combination of English (my native language) and Spanish (his) and sometimes we think we understand each other but don’t. It’s so sturdy it may even hold up the house in the case of an earthquake.
To the right of the structure is still a bit of closet hanging space where I hang my painting smock and my plein air painting outfit, a very lightweight, ventilated, long sleeved, sunproof shirt so I don’t need sunscreen and lightweight pants that are also sunproof that turn into shorts when you unzip and remove the legs.
The top shelf of the structure (below) provides a place to put my other plein air gear: my Soltek easel, my brushes in a canvas brush carrier, and two canvas carriers from RayMar Art, the company from which I also buy my painting panels (they are archival, don’t warp and are less expensive than most of this quality).
Shelf for easel and other plein air equipment
LIGHTING
Below is the setup for lighting still life that I’m finally satisfied with, after trying numerous other lightbulbs, fixtures, and other accessories. I wanted a way to get a strong directional light on the still life so there was good contrast in values, modeling of the shape and structure of the object(s), a strong shadow shape without double or triple shadows caused by interference from other lights, and a light color/temperature that gives the illusion of sunlight. A tall order indeed!
Still life lighting set up
As you can see above this system creates a nice swath of directional light, with a strong single shadow (though the photo doesn’t do it justice–it’s hard to photograph lighting!). Below is another picture of how I have it set up.
I went to a local lighting store and we tried out all sorts of things. It took them awhile to understand that I wasn’t buying lighting to light a painting, but to light a still life I was going to paint. They recommended a short section of halogen tracklighting with a narrow-beam floodlight halogen bulb. They added a cord and switch for me since I was going to keep it nearby rather than permanently install it on the ceiling. Then I attached the track light to a cheap old lighting stand I had from photography days.
Track light attached to light stand
The ugly cord and switch on the left above is an inelegant solution that allowed me to avoid having to have an electrician wire the overhead light. It just plugs in and switches on and off. Too bad the cord isn’t the right length.
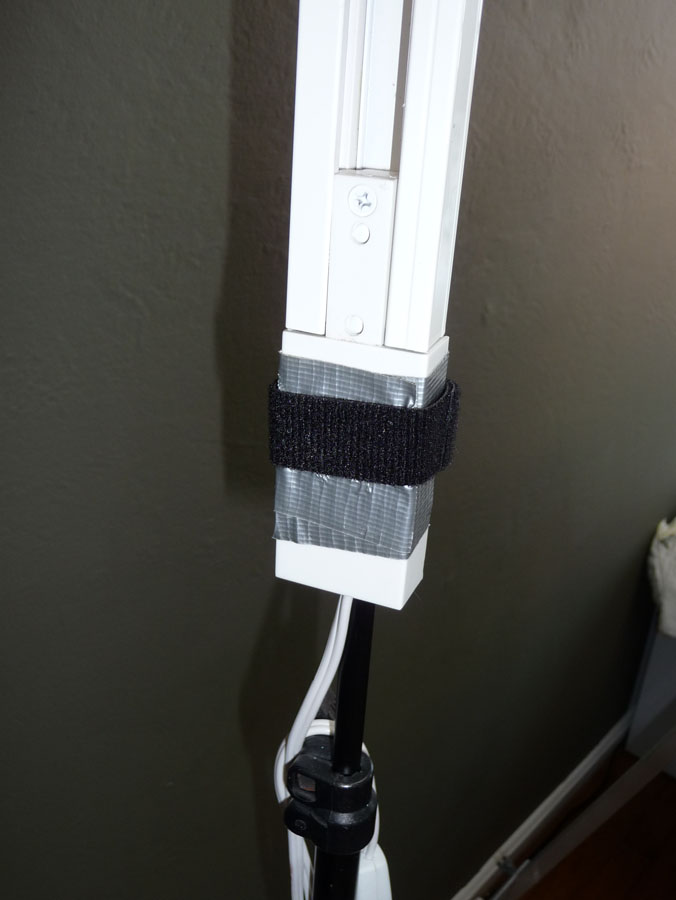
On the two pics below you can see how I used duct tape and a strip of velcro 2-sided strapping to attach the track light to the stand.
Track light with halogen spot attached to old light standDuct tape/velcro attachment
Below is the lighbulb we found that works perfectly for this application: Sylvania Tru-Aim Brilliant Halogen (50MR16/B/NFL25) which I think means it’s a 50 watt narrow-beam flood light.
Lightbulb box for track light
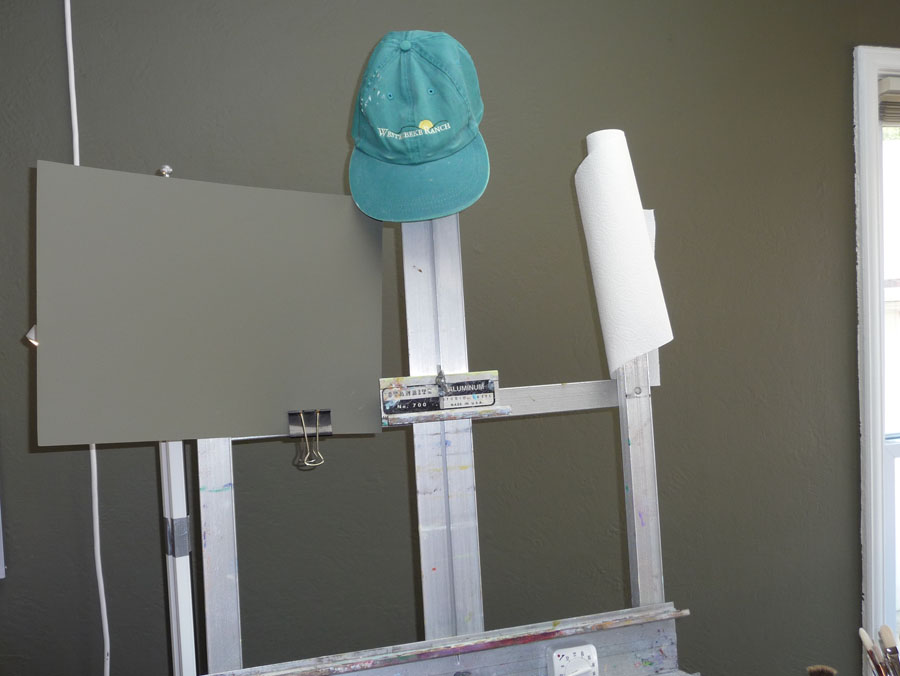
SInce the light was so bright I made this cardboard shield and painted it the same color as the wall and clipped it on to the easel so I could study the still life without also looking at the light. I’m sure there’s a more elegant solution, but this works. The paper towels sit on a funky paintbrush which is stuck into a slot at the top of the easel.
Cardboard painted with wall paint to shade light, paper towel "holder"
My WorkRite electric desk, which holds my computer and monitor not only allows me to work sitting or standing but I discovered that I can use the end of the table by the easel to place a still life at whatever height I like. I can also display a photo on the monitor and scoot the monitor closer to the easel to work from.
Set up for still life with electric desk
I can hang different colored cloths as still life backdrops from the bulletin board with pushpins and I like having artwork on it that inspire me.
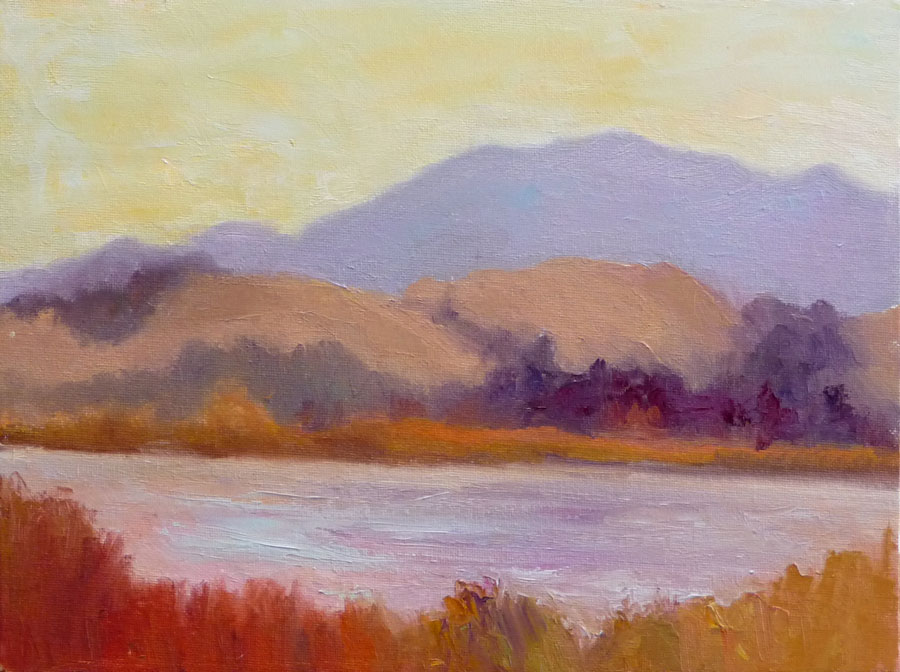
The painting to the left isn’t usually there. I hung it when a gallery owner came over for a studio visit because she was interested in including it in an upcoming show (it will be there next month — more about that later).
Another view
I should also say that I have no financial or other interest in any of the companies or products I mentioned in this post. I just like them.
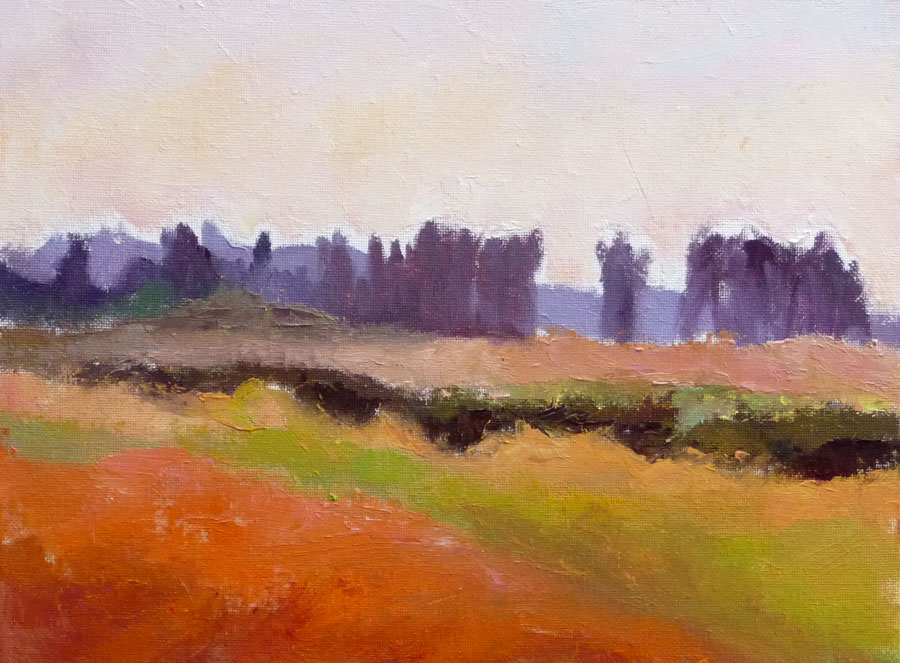
Dry wetlands sketch, 12x9", Oil on panel (click image to enlarge)
Shollenberger Park is normally a watery paradise where you see swans, herons, egrets, pelicans, geese, turtles, frogs, lizards and the occasional harmless snake. But when I arrived there this morning with Camille Przewodek’s class, we were surprised to find cracked dry soil where the watery marsh used to be. Camille said she’d been painting there for years and had never seen it dry before. You can see many of her marsh paintings on her website here.
She set up for her demo in the hot sun, on land that used to be under water. Seeing her paint is like watching a magician, the way she creates the illusion of space, depth, atmosphere, weather, even time of day, all done with color relationships.
The smell from the dried up marsh was making me nauseous but nothing phases Camille when she’s painting. She never complains, whether it’s hot or freezing, windy or smelly; she just gets in the zone and paints. Her students know better than to whine about weather or anything else; or as one student pointed out:
“It’s called ‘PLEIN Air’ NOT ‘Complain Air’!”
About the paintings:
Both of these 1 to 2 hour plein air sketches were done at the marsh, trying to work on getting the big shapes and color relationships. I think my easel must not have been level today; the horizon seems to be slanting downhill on today’s sketch above.
Shollenberger Wetlands sketch, 12x9", oil on panel (click image to enlarge)
When I got home I tried to find out what happened to the water at Shollenberger but couldn’t find anything online. I did learn some interesting things about wetlands and what a valuable and important resource they are on the Petaluma Wetlands site.
I know we’re having a drought in California, but I don’t see how such a large body of water could dry up that quickly from being full just a few weeks ago.
I hope all the birds and fish and froggies are OK. If you know what’s going, please do tell!
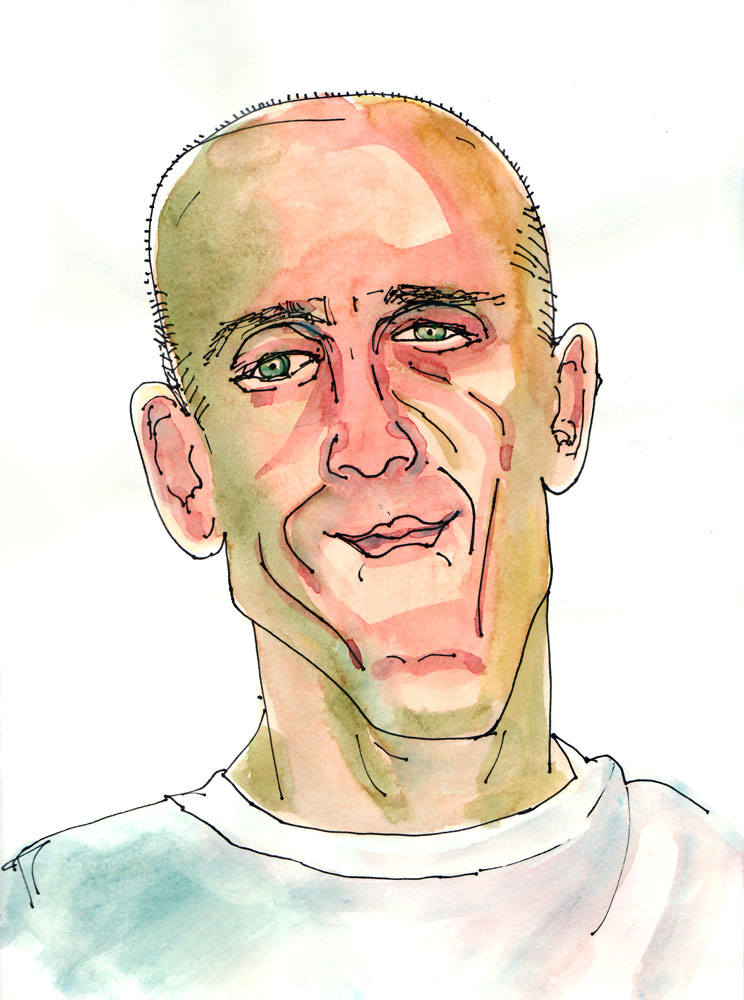
ANDY by JANA
Ink & watercolor, Aquabee sketchbook, 12×9″ (larger)
Andy of “Drawn to Running” emailed me and invited me to do a portrait swap with him. I think he’s quite adorable and looks like someone with a very kind heart. I exaggerated in my sketch of him but had great fun doing the drawing, which was a relief after my struggles in the studio earlier this week.
Here’s his excellent portrait of me: an amazing likeness!:
JANA by ANDY
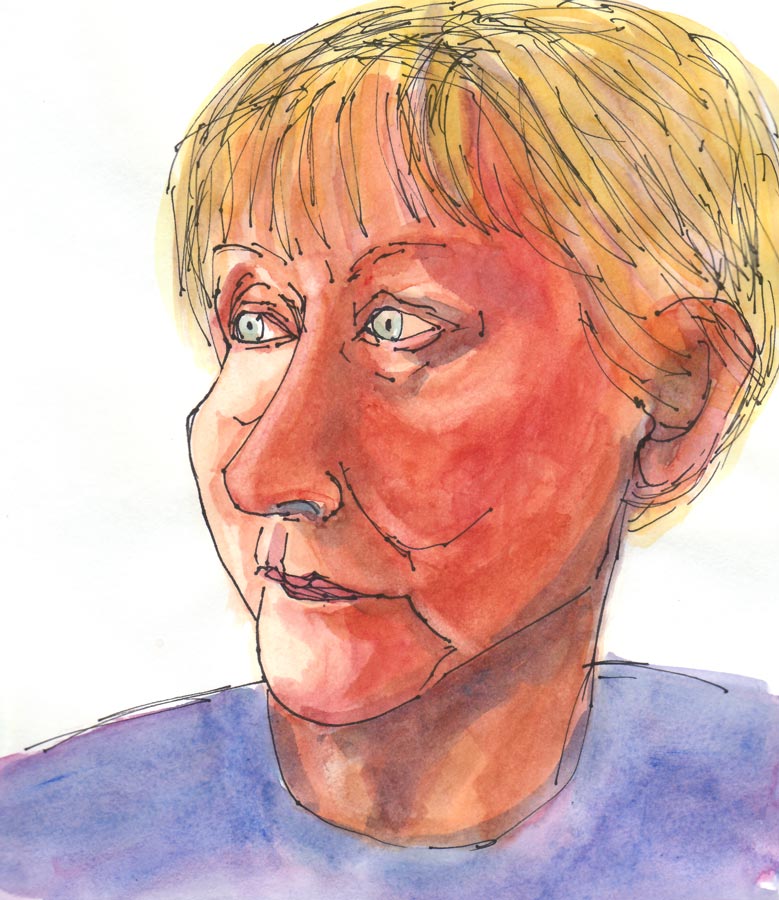
I’m still working on painting Nel and I’m determined to succeed to capture her image from one particular photo without making her look unattractive, which she most definitely is not! Here is another attempt (3rd of those I did today, the first two not worth posting!).
NEL #6
Ink & watercolor, Aquabee sketchbook, 12×9″ (larger)
Drawing in Sharpie is great fun. You have to move quickly or it starts to bleed; you can’t erase, just have to redraw the lines. I enjoy this kind of “take a chance and go” drawing and quick painting so much more than careful labored work these days.
Nel and Rita both did wonderful portraits of me for the Portrait Party. You can see Rita’s here andNel’s here. They captured my likeness and a sense of my funny side and joyfulness.
You might notice that the drawing is exactly the same in both paintings. That’s because I did the drawing first and scanned it “just in case” I messed up. Then, when I wanted to do another painting, I printed the drawing out on a piece of watercolor paper and started again.
I’m not happy with any of these, and I seem to have put my frustration on Nel’s face. Since that seems to be the general theme in my painting this week, maybe it’s time to move on to making color charts, always a good thing to do when the muse is on strike.
Nel in Sharpie and watercolor in Aquabee 12×9″ sketchbook (larger)
Two art blogger friends and I are swapping portraits for the Portrait Party‘s Happy Birthday Party. You can see there pictures of me here on Nel’s blog and here on Rita’s Flickr page.
Anyone can join in the drawing fun. Just grab a friend and sketch each other; follow the directions here. To be included in the Happy Birthday Party contest, you need to submit your sketch to the Portrait Party by March 31.
RITA in Sharpie and watercolor in Aquabee 12×9″ sketchbook(larger)
My painting group met at my studio tonight and we finally caught up with each other after a month of way too much busyness to meet regularly. Lea finished illustrating her latest children’s book (which I think is going to become a classic) and shipped the last of the paintings off to her publisher. Susie shared some beautiful watercolors from her trip to Hawaii. Sharon was working on an abstract watercolor and while she painted, Judith surreptitiously sketched her. To get even, Sharon did a quick watercolor of Judith.
Then we uploaded their portrait swaps (below) to the Portrait Party. On the left is Judith’s sketch of Sharon. Sharon’s quick watercolor of Judith is on the right. They both captured each other’s essences in a powerful way.
(click images to enlarge)
It’s been a while since I’ve sketched with those very unforgiving Sharpies and it was fun and somehow liberating to just start drawing and see where I ended up and then loosely add watercolor. I was working from photos I was sent by N. and R. I’ve never met either of them in person but I find it’s often easier drawing someone I don’t know intimately. One of the photos N. sent me was so intriguing that I plan to attempt a more serious portrait from that image later.
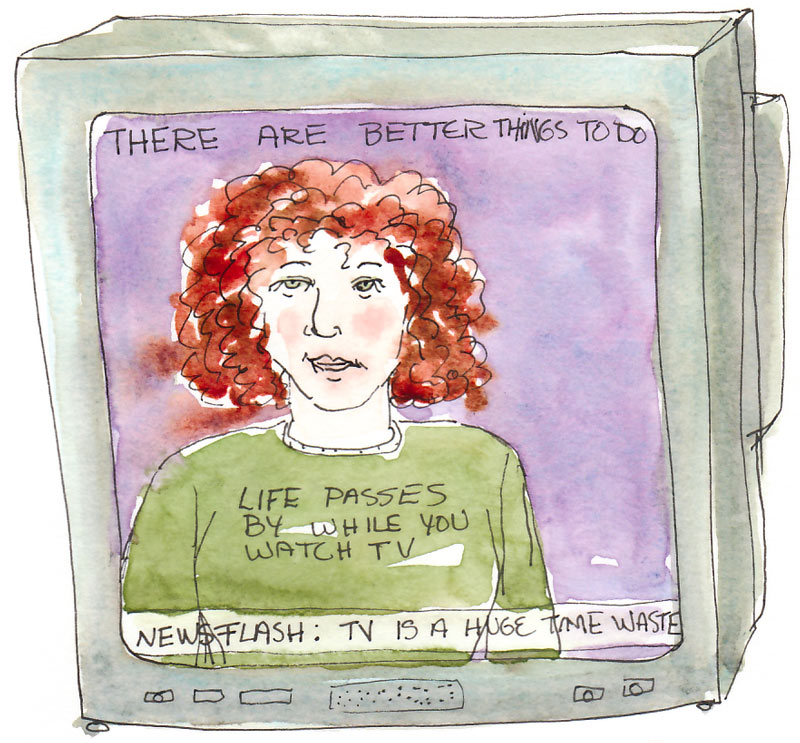
“Life is what passes you by while you’re watching TV.” I used to have a little sign on my TV with those words, but back then it was a reminder to my kids, not to me. Now I need it for me.
I was chatting with my friend Lin [View from the Oak] about our struggles to find time for everything. Lin manages to paint or sketch every day, post it on her illustrious blog AND leave wonderfully encouraging comments on countless other blogs, all while working a grueling schedule and making time for her husband, offspring and grandbabies.
It occurred to me later that day: I bet Lin doesn’t watch TV! It turns out I was right. Other than the art videos she watches while on her treadmill, she rarely watches TV. She said that sketching IS her TV, her way to relax.
I used to be like that too but somehow, over time, TV has insidiously infiltrated my life. I turned to it as a way to relax when my brain was tired from thinking hard all day at work. But it puts me in a stupor so I just watch another show instead of doing something more satisfying (or just going to bed when what I really need is sleep).
Now it’s time to pull the plug! I may even cancel my cable and TiVo subscriptions and go cold turkey for a while. I bet that not only will I gain time and save money (on cable and TiVo bills), I might even lose a couple extra pounds, since watching TV often leads to snacking on empty calories while burning none!
Have you successfully quit TV? If you have any tips, I’d love to hear them!
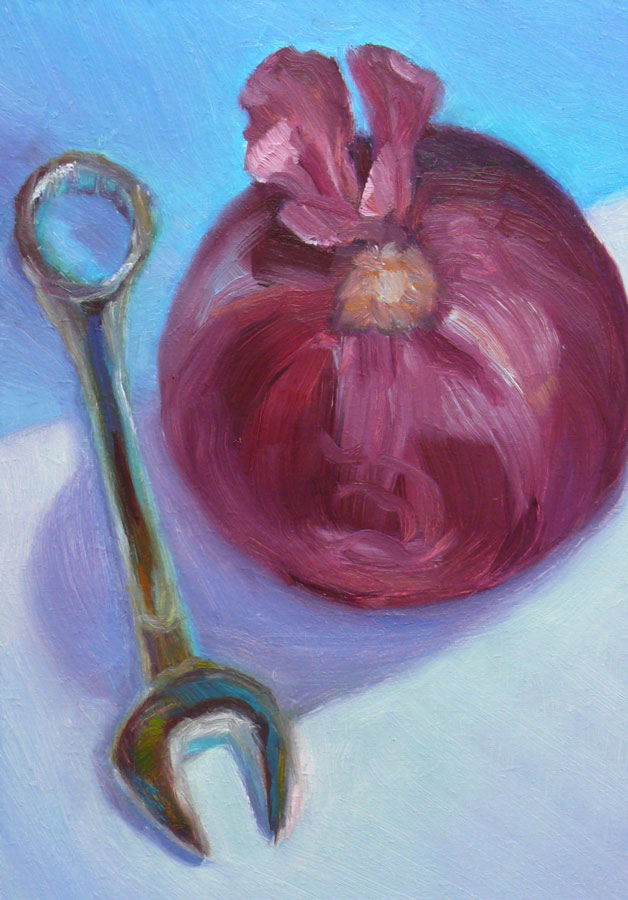
My favorite part of this quick oil sketch are the little flag or wing-like thingees on the top of the onion. I had a variety of problems with this painting, some of which I solved and some I didn’t.
I still haven’t gotten still life lighting worked out. I was about to build a set up like I saw on Carole Marine’s blog here and here, but discovered that while the pvc pipe she used is very inexpensive, the fittings are not. It was going to cost around $50 for the fittings and pipe so I decided to go back to using my 3-sided cardboard box still life “stage.” But my overhead full-spectrum fluorescent lights are right next to the table beside my easel, so it’s hard to block out the overhead light to prevent light sources coming from different directions.
I’ve also been experimenting with different kinds of light bulbs to direct at the still life, from color balanced fluorescents and incandescents to halogen. I even bought some sheets of colored photographic “gels” to use as filters on the lights to create a warm or cool light. So far nothing has worked as well as painting outdoors; Mother Nature is the best.But in my neighborhood near the San Francisco Bay where it’s often foggy and windy and the light changes constantly, outdoor still life painting can be frustrating.
If you have any tips on lighting still lifes, I’d be most grateful to hear about them!
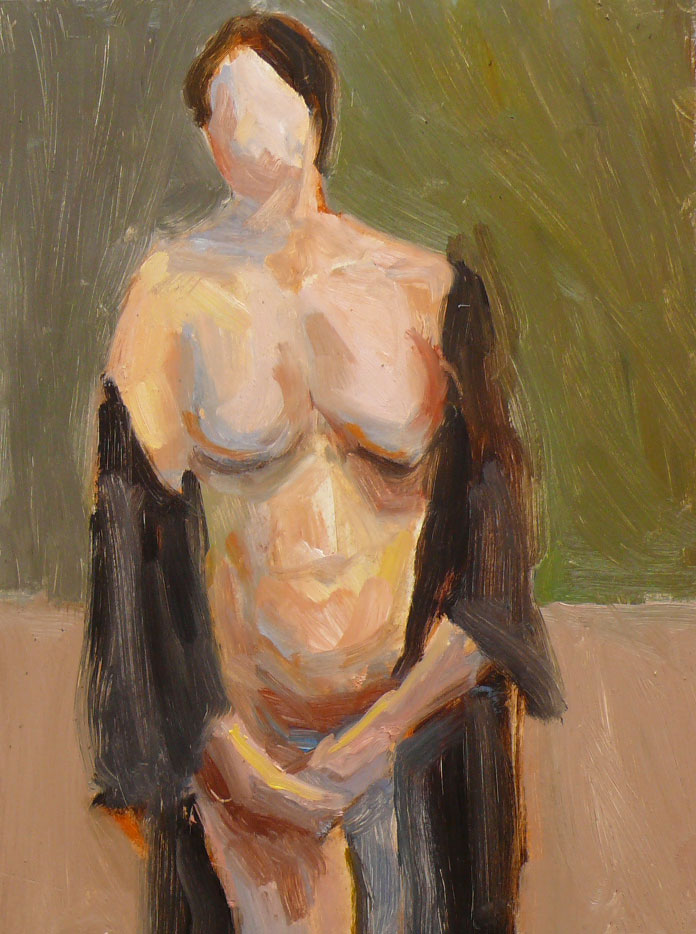
I thought I would scrape off and reuse this panel but when I photographed it I found there was something about the rawness that I liked. It was the second sketch of the first day of my “Weekend Warriors” figure painting workshop with Randall Sexton, a talented and kind teacher. The model, Meri, was the best I’ve worked with…beautiful, voluptious, charming and a real professional. She is originally from Argentina and came to the SF Bay Area after working with artists in New York City for 10 years.
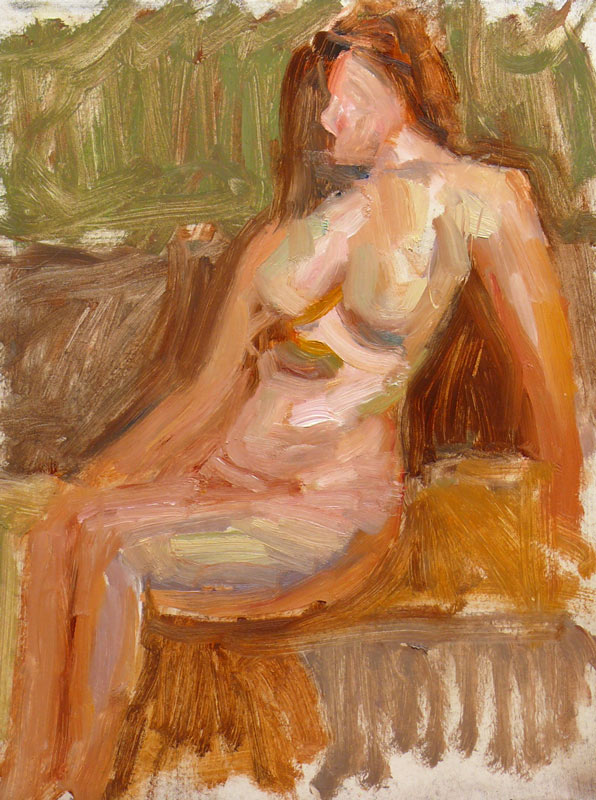
Below is another 20 minute sketch from day one. Again, I thought I’d wipe and reuse but since I kind of like the energy in it (and didn’t like the cheapo Aaron Brothers panel — way too smooth a surface) I think I’ll hang onto it. (Which means it joins the big stack of “learning opportunities” in my closet until I’m ready to dump them).
Oil painting from a live model is sort of like plein air painting: time is limited and there are so many elements that need to be right (drawing, color , value, likeness etc.) for the painting to work. There is so much to see, discover, understand and interpret in 20 minute sprints of painting.
The model’s breaks between poses afford an interesting opportunity to walk around the room and see what others are doing. I was struck by how different each artist’s work was. There were some very accomplished local painters in this weekend class. I had the good fortune of setting up beside Iris Sabre, a local painter whose style and technique I greatly admire.
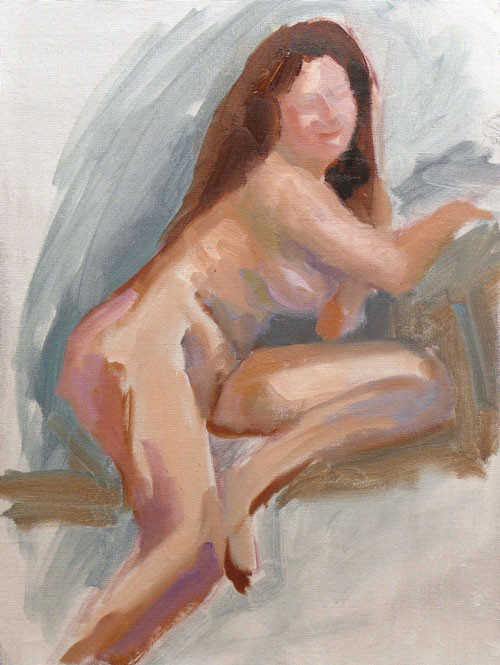
I started the larger painting below at the end of day one, with two 20 minute sessions. When we returned on Day 2 we had 3 more 20 minute sessions to “finish” up. This is nowhere near finished (but I wish I’d at least gotten around to fixing those giant hands!)
This was the 20 minute warm up sketch at the beginning of day two: Oil on canvas panel, 12×9″ (larger)
This was the final painting on day two, about 2 hours and again, not close to being finished and suffering from chalkiness and my exhaustion: Oil on panel, 20×16″ (larger)


