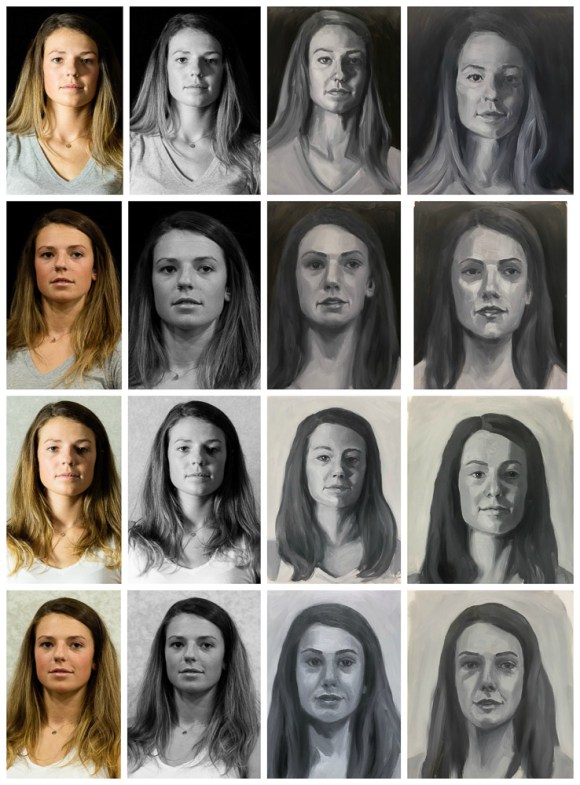

When my art friend Chris Beaven commented on the previous version of this post that it would be interesting to see my studies compared to the black and white versions of the photo references, I did a virtual dope slap (Of course! What a perfect way to see if I got the values right!) and then decided to redo this blog post to show that comparison (above).
While I often convert color photos to black and white to see the values, when I did these studies from Bill Perkins’ Color Boot Camp on New Masters Academy I wanted to try to do the conversion in my artist brain instead of using technology. But putting my studies next to the converted photos gives me just the reality check I needed. I can see that I did pretty well in painting the values from the color photos.
In the lesson he set up one model in four different lighting situations and then demonstrated doing a 30-minute painting of each in black and white. He recommends doing the studies in no more than 30 minutes, emphasizing that it’s more important to do many starts, without worrying about getting a likeness or making finished paintings. I have to admit spending longer than 30 minutes, probably up to 3 hours on some, and in retrospect, the longer I worked the less effective the study was.
If you want to see Bill Perkin’s studies and mine in greater detail, click the “read more” link below.Each of the series posted below show (1) the reference photo, (2) Bill Perkin’s 30 minute study, (3) my first study and then (4) my second study, with my comments below each group and a few thoughts/questions at the end. I completed all 4 assignments and then started them over again in the same order.
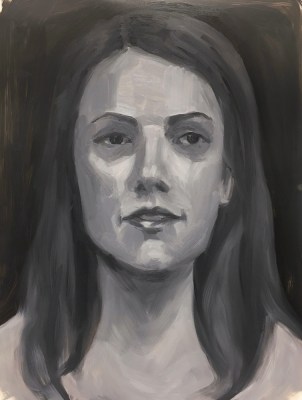
Color Boot Camp Part I, Assignment 1: Low Key (mostly dark), High Contrast
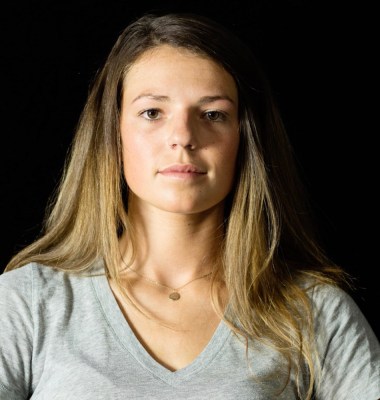


In my first attempt I emphasized low key and didn’t get enough contrast so in my second attempt I focused more on contrast. I also made sure that the light, middle and dark values on the dark side were all darker than those on the light side. He emphasized that each zone needs its own set of values.
Color Boot Camp Part I, Assignment 2: Low Key, Low Contrast


Subjects under flat lighting with little contrast between light and dark within the face were very difficult for me to paint. He suggests just using the “local color” as it appears in grayscale to model the 3-dimensionality, or to just emphasize the flatness. I tried the former, and looked for any change in value I could find but without color it wasn’t very much fun or very successful.
Color Boot Camp Part I, Assignment 3: High Key (mostly light), High Contrast


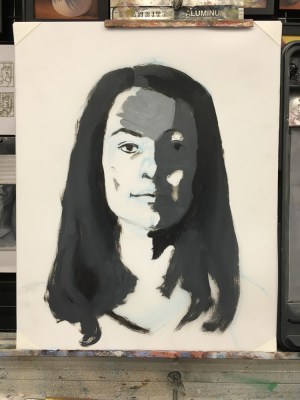


When Perkins demonstrates, he blocks in the light side in one average light value and the dark side in one average dark value. Then he adjusts them with light, middle, and dark for that zone. I tried doing the same on my first study above. It was fun and worked pretty well but I didn’t end up with enough contrast in the value range. So on the second study I blocked in each zone with 3 values and then adjusted further. I painted 1-3 #1 in the shortest time, did the least amount of fussing on it and it’s the study of all 8 that I like the best. I like her happy, friendly expression better than the second one; she looks like I felt at that point: slightly annoyed and questioning.
Color Boot Camp Part I, Assignment 4: Medium Key, Low Contrast (Flat Lighting


I struggled again with the lack of noticeable planes and 3-dimensionality in the flat-lit photo reference. In step 1 of my first study I could have really just left it all flatly painted. Even though it was just a quick block-in it feels more effective than the splotchy completed studies 1 and 2.
QUESTION and THOUGHTS
I learned a few important things I already knew intellectually but needed to do the work to internalize them. But I’m struck by how predominately middle-value gray Bill Perkins’ studies are, especially the model’s skin. Is it because she has tanned or olive skin or is my idea just wrong, that caucasian skin has a much lighter overall value than middle gray (depending on the lighting and the surroundings of course)?

6 replies on “Revised Post: Color Boot Camp Monochrome Studies”
Thank you for sharing your work in this way – very helpful! You’ve done a great job! Could you possibly tell the position of the light source for each setting? And I gather that the backdrop was very dark or light fabric. Thanks!
LikeLike
The reference photos were created at the New Masters Academy studios. You can kind of tell where the light is coming from by how the face is lit and shadowed. In the “flat lighting” scenario I think the light is from the front, probably a little above, and in the high contrast settings the light is coming from the left side and above since the nose is making a shadow below it.
On Wed, Apr 6, 2016 at 2:32 PM Jana Bouc, Artist wrote:
>
LikeLike
That’s what I figured, and then if it was a desired low key, then a darker backdrop probably. Thanks!
LikeLike
Very nice! I find it interesting that when I squint your first attempt at each value study actually looks more accurate to the grayscale image, but I like the second versions better. Maybe because the contrast in the second attempts is a bit higher?
LikeLike
Hmm. I’m sorry I missed this comment the first time around. Interesting observation!
LikeLike
[…] I’m motivated by Jana Bouc’s work from the color bootcamp with Bill Perkins on New Masters Academy. She did a great job on the […]
LikeLike