Categories
Art theory Blake Gardens Landscape Oil Painting Outdoors/Landscape Painting Places Plein Air

Blake Gardens Revised; Pondering Painting

Blake Gardens Revised, oil on panel 9x12"

When my sister looked at the original version of this painting (posted here) she told me her eye kept going to the bright area in the upper right. There was a lot that was distracting in that image, and I thought the ground was too dark and the two little patches of flowers on opposite sides of the path were distracting too.  But now maybe I lost some of the sunshine by lightening the ground and darkening that corner?  (see original below)

Blake Gardens Late Afternoon, oil on panel, 9x12"
Blake Gardens (version 1, click to enlarge)

So it was back to the drawing board…er easel. I spent some more time working on it and I think it’s done now. Which do you like better? Or do you think the revised version needs more work and if so what?

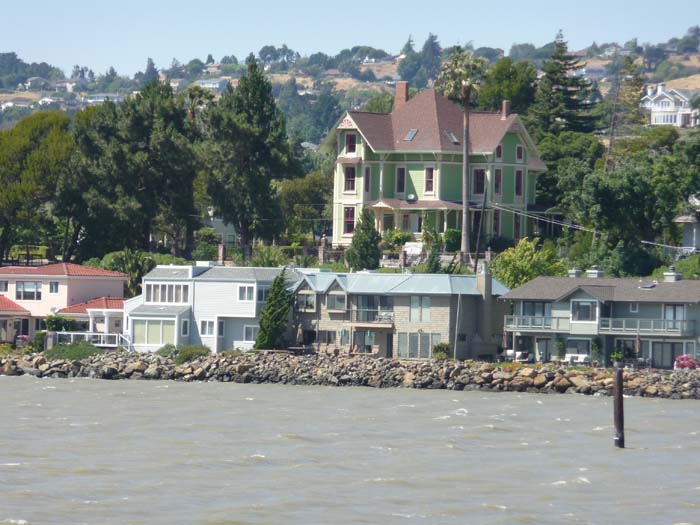
Yesterday I was out plein air painting in the funky little town of Port Costa, and because I was painting buildings, spent more time drawing than painting to get the perspective right.  (Which makes me realize I need to add one more point to my How to Oil Paint Plein Air List: # 5. “Get the drawing right!”). Today I tried to (but didn’t quite ) finish it. While I used to often spend a month or more completing a watercolor painting, for some reason I have the idea that an oil painting should be finished more quickly, like in one session.

Perhaps what bothers me is that when I paint plein air I work small, using a 9×12″ panel.  It seems like a waste of time to work such a small painting for days afterward, putting in lots of details (because I like details, darn it, even though plein air oil paintings are supposed to be simplified).

Maybe the trick is to paint the plein air painting as a simplified field study and then if I like it, if it has life and soul and the subject still interests me, grab a bigger canvas and paint big where I can really get into things like reflections in windows and other crunchy details,  instead of continuing to work on the study.

But for now, it’s back to overworking yesterday’s study since I just scraped off the bottom 1/4 of the painting and need to redo it before the paint dries.

Categories
Art theory Landscape Oil Painting Outdoors/Landscape Painting Plants Plein Air

My “How-To Oil Paint Plein Air” Cheat Sheet

Blake Gardens Late Afternoon, oil on panel, 9x12"

After my flop of a painting on Saturday, I was determined to have another go at plein air painting. But first I wanted to put together a cheat sheet; a personalized “How to Paint Plein Air” based on what I’ve learned from teachers, books, experience, mistakes, successes and goals. I started jotting down notes as ideas and images came to me and then when the list felt complete, I typed it up and taped it to my paint box so that it will always be with me when I’m out painting. I posted another on the studio wall.

Then I went out to paint. First I drove to a site I’d been wanting to try out, a hillside cemetery in El Sobrante with what I thought would be  interesting views. But once I found a spot where I could be off the road and away from mourners, it was so windy, and the view so boring, that I left and headed for Blake Gardens.

By the time I got there and set up, I only had an hour and a half to paint before they closed at 4:30. It was so serene and beautiful there and the weather was perfect, warm sunny and no wind. I worked as fast as I could, finished all of the main areas, and added the final touches at home.

It was a confusing scene with all sorts of trees and foliage, but not having enough time helped me to simplify rather than draw all the trees in the background. I took artistic license to move things a bit to improve my composition and to delete something that wasn’t working. I’m learning!

Here is my Oil Painting Plein Air Process Cheat Sheet. I imagine it will change as I learn and grow, but it definitely helped me with this painting.

  1. FOCAL POINT: Choose one!
  2. COLOR KEY: Decide: Will the painting be predominantly Warm or Cool, High key or Low key, Predominant hue?
  3. SQUINT! to see values, simplify
  4. THUMBNAIL: Keep making them until there’s a good composition with leading lines in to focal point. A bad composition can only lead to a bad painting.
  5. CANVAS: Transpose thumbnail to canvas, creating large puzzle piece shapes, using pastel pencil or thin paint.
  6. UNDERPAINT: Loose, sketchy monochrome underpainting of shapes, darks with very diluted paint (optional)
  7. DARKS: Thinly paint the darks but MATCH values and colors using value scale and testing paint first on edge of little cards held up to compare to actual color. Just because it’s dark doesn’t mean it’s black.
  8. PAINT LARGE SHAPES: Match or exagerate the average (VIBRANT) color in  large shapes, using not too thick paint.
  9. COLOR PATCHES: Break larger shapes into smaller patches of color and light, matching or slightly exagerating the color.
  10. HIGHLIGHTS & ACCENTS: Add thick LIGHT paint, thin dark accents, and occasional splashes of “broken” color  for VIBRANCY.
  11. EDGES: Put a dab of COMPLEMENTARY colors around edges of focal points to pop, SOFTEN and/or cool receding edges.
  12. STOP: It’s a field study!

If you have discovered other things that have helped you and are willing to share them, I’d love to hear about them. And if you’d like more information about any of the items on my list, let me know and I’ll do another post with more explanation and details.

Categories
Drawing Ink and watercolor wash Life in general Painting Plein Air Sketchbook Pages

Loster Than I’ve Ever Been

Chapel on Mare Island
St Peter's Chapel on Mare Island

What was I thinking? Somehow, despite printed instructions, my GPS unit and mapping software on my iPhone, I managed to get more lost than I’ve ever been in my life today (except for the time I was driving across country on highways and somehow ended up on a dead end street). I arrived so late at our painting site that there was no time to set up all my gear so I just did this quick, wonky sketch.

The paint-out was on Mare Island, a former naval base and shipyard with historic buildings, factories and old officers’ mansions.  First I was a little late leaving the house, and then, after going over the Vallejo-Carquinez bridge four times, and multiple wrong turns (second guessing the GPS), and driving in circles, I was REALLY late.

Part of the problem was not being able to get to sleep the night before and drinking way too much coffee to try to wake up in the morning. But the biggest problem was that I hadn’t taken the time to pinpoint where I was going and so the information I put into the GPS wasn’t accurate. And the stupidest thing was that my plein air group had provided me with perfectly simple instructions which I complicated by using my GPS incorrectly. (A perfect example of GIGO: Garbage In: Garbage Out).

By the time I got home I was tired, hungry, disappointed and frustrated so it seemed like a good day to work on the rebuild of my website. At least I made good progress on that and accomplished something today.

Categories
Drawing Ink and watercolor wash Painting Photos Plein Air Sketchbook Pages

Blowin’ in the Wind in Benicia

Paddlewheel Benicia, ink & watercolor 9x12

Da Group” (Benicia Plein Air Painters) met to paint at 3:30 today at a private boatyard in Benicia. The owner of the boatyard is a professional house mover so along with the numerous old boats docked there, his property also contains two wonderful old Victorian houses that he moved by barge to his property and will eventually fix up, planning to live in one, and use the other as an office. (The office is currently home to a huge flock of pidgeons, so he has his work cut out for him.)

He generously allowed us access to his property to paint. It it was so windy that I decided to sketch instead of hauling out my oil painting gear, even though there was a plethora of tantalizing painting subjects. This old paddlewheel boat was really fun (and challenging) to draw. I had my 9×6 sketchbook, a teeny weenie watercolor set (6 colors in a miniature Altoids tin, about 1″x3″), one paper towel, a water bottle, and a water brush. It was tricky holding onto everything so it wouldn’t blow away.

The other painters were braver, found more wind-sheltered spots to set up, and then painted whatever was in their line of sight. They were still at it when I left at 6:00 p.m., my eyes and ears stinging from the wind.

Here are some of the sights around and near the boatyard (click images to enlarge):

Categories
Art supplies Painting Photos Plein Air

ShadeBuddy Umbrella Review

Plein Air set up with ShadeBuddy Umbrella
Plein Air set up with ShadeBuddy umbrella & stand

Have you had bad experiences with plein air umbrellas that were flimsy, funky, poorly designed, or just plain hazardous when it gets windy? Often when my plein air group is out painting, a gust blows over an easel or two when the umbrellas attached to them turn into sails.  When I felt my old umbrella about to carry off my easel I started attaching  it to the tall handles of my rolling cart (which also got pulled over once) but I had a hard time adjusting my small umbrella to be in the right place, at the right height or at the right angle.

Now I have a ShadeBuddy Umbrella and Stand and the problem is solved. In the picture above the umbrella is set up in my backyard next to my Soltek easel. (Also pictured, is my trash container (a mesh pop-up laundry basket that folds flat to a  circle about 8″ in diameter) clipped to my easel,  a folding brush holder, and a plastic shoe box that holds my paint palette and paints. You can see the large area of shade the umbrella provides.

The pansies and pitcher on a table I was preparing to paint are on the far right.

Cylinder that holds umbrella

The umbrella and the stand are two separate sections that fit together into the sturdy black zippered bag with a shoulder that comes with them. At the top of the stand is a white cylinder (above) into which you stick the umbrella’s wooden handle. There is a secure locking mechanism for keeping the umbrella in the cylinder and a knob that allows you adjust the angle of the umbrella and then holds it in firmly at that angle.

Foot lever
Foot pedal

The cylinder is attached to a metal pole that has a pedal about six inches from the bottom that you step on to push the pointed end of the pole into the ground. When I set mine up for the first time I was surprised how well it all worked and how easy it was. I tend to be spatial-relations challenged and am always prepared for difficulty when assembling things but this was a snap. I was able to adjust the tilt and direction of the umbrella as the sun moved, and the vented umbrella handled the afternoon wind gusts with  without even a flutter!

The umbrella is very well made, with a 48″ diameter with “wind vented construction combined with a nonreflective black lining to keep your colors true and a reflective silver outer shell to keep you cool.”  Both the closed umbrella and the pole are 48″ long and, when stashed together in the bag, weigh a little over 4 pounds.

The umbrella and pole are manufactured and sold by Judsons Art Outfitters and are also sold at several major online art supply stores. I checked prices and availability on the web and bought mine on sale from Dakota Art Pastels. It was my first purchase from Dakota (in Washington state) and they provided excellent service. My new umbrella arrived two days after I ordered it.

Having the easel made my previously posted painting, “Pansies in Pitcher Plein Air”  a pleasure to paint, even under the hot sun in my windy backyard.

Because I really appreciate good tools and well-made products that just work (and that experience is so rare!), and because I know that many other plein air painters struggle with lousy umbrellas that flop or fly, I wanted to share my positive experience. I have no other connections with the manufacturer or store (except that I think highly of both).  Judson Art Outfitters also manufacturers the Guerilla Painter line of plein air products and is a family-run business with very helpful and knowledgable staff who can answer most plein air outfitting questions with expertise.

Categories
Flower Art Gardening Oil Painting Painting Plein Air Still Life

Pansies Plein Air

Pansies in Pitcher Plein Air, oil on panel 12x9"

The weather was too perfect to paint indoors but I didn’t feel like driving anywhere. My next door neighbor was out pruning his pansies and he’d pulled out a whole bucketful he was about to put in the compost bin.  Voila! A perfect painting subject. I stuffed a big clump of the pansies into a pitcher and set them on a table in the backyard.

I’d made the pitcher as a gift for my friend Barbara in the late 70s when I was a ceramic artist and she was a silversmith. She’s now a brilliant and prolific ceramic artist herself and she recently gave me the pitcher back. She was no longer using it due to a leaky crack and a house full of her own ceramics. I’ve been enjoying using it in still life set ups while fondly remembering it being filled with Mimosas every year for the annual Easter egg hunt and brunch her family held every year while our kids were growing up.

I knew that time was very limited before the shade moved across the yard onto the table so I worked quickly and had a great time.

Here’ are a couple steps in the work in progress:

Pansies Plein Air WIP #1
Pansies Plein Air WIP #2
Categories
Bay Area Parks Landscape Marin County Oil Painting Outdoors/Landscape Painting Photos Places Plein Air

Cloudy Day on the Bay, View from China Camp

Cloudy Bay, View from China Camp, oil on panel, 9x12
Cloudy Bay, View from China Camp, oil on panel, 9x12"

When I first arrived at China Camp in San Rafael for our plein air paint-out, I decided to make the dramatic, dark clouds my subject. Except that once I’d completed a quick thumbnail sketch for composition, drew the main shapes on my panel, blocked in the colors of the sky, clouds, land, water… POOF! The sun came out, the clouds blew away, and the hills that were my darkest darks were now glowing with light.

Since the scene was now completely different I put the panel away and started another small study, which I might mess with a bit and post another time.

I planned to finish the first painting in the studio, from photos I took before everything changed. Of course later when I looked at the photos, they had none of the color and drama I’d seen and felt in person. So I tried to work from memory along with the photo, and eventually just let the painting tell me what it needed.

This is the original block-in with the painting barely started. I’d put the clouds in first, but after I’d blocked in the rest of the elements, realized they were way too dark.

China Camp View blocked in

And this is the photo of the scene, in which the colors are all wrong, and which mostly just confused me when trying to paint from it.

Photo of China Camp cloudy view

As a wonderful bonus to the pleasure of being out painting on a gorgeous day, my painting group had hired plein air painter Elio Camacho to lead a workshop for us that day. I used to study with Elio a couple years ago so it was great working with him again. He is such a generous teacher and brilliant artist. Everyone had rave reviews afterward and were very pleased with what they’d learned that day.

Categories
Landscape Oil Painting Outdoors/Landscape Painting Photos Plein Air

Shorebird Marsh in Corte Madera; new oil painting

Shorebird Marsh, Corte Madera, Oil painting, 9x12"

A few weeks ago my plein air group met on a blistering hot day at a little shadeless park alongside a marsh that was right next to the noisy highway and a block from an upscale shopping center (Village Shopping Center in Corte Madera). Some watercolorists in the group set up at the shopping center but were kicked out for taking up outdoor tables meant for food court customers.

Reference photo
Reference photo

I was tempted to leave. The scene didn’t appeal to me, I was tired, it was hot, there was no shade or other facilities and the noise of the traffic was terrible. But I decided to give it a shot, and of course, as I started drawing I got more enthusiastic (“such cute hills” I said to myself, and listening to music with headphones helped block out the highway noise.

Initial sketch on panel

I stopped taking photos after the one below because I was trying to finish quickly as the temperature kept climbing. I nearly completed the painting on site before I started  feeling like I was getting sunstroke and had to pack up and head home, without even waiting for the critique.

Starting to block in color

I worked from the reference photo a bit in the studio but then just started addressing the painting’s needs instead of what was in the photo. I tried not to mess with the hills and trees that I’d painted on site because I liked the way they were loosely painted in.

Categories
Bay Area Parks Drawing Flower Art Ink and watercolor wash Landscape Outdoors/Landscape Painting Places Plants Plein Air Sketchbook Pages

Tilden Botanical Garden Sketches

Pacific May Lilly at Tilden Botanical Garden, ink & watercolor, 4x6"

My plein air group met at Tilden Regional Parks Botanical Garden this cold and foggy morning. Since I wasn’t familiar with the park I explored a bit and then decided to sketch instead of trying to drag my painting gear around the hilly, pebbly paths. Since I only had my large Moleskine and a Micron Pigma .01 pen with me, I added watercolor later at home. The May Lilly above was so sweetly but delicately scented that drawing beside it was like breathing in a dessert.

Bridge & Creek, ink & watercolor, 5x7"

This bridge and creek was the first thing I sketched when I arrived, still arguing with myself about whether to go get my painting cart, whether to go home because it was too cold, whether to go home because I arrived late, how I should have brought my watercolors, how the scene was so complicated and so maybe I should just go home.

But as I drew,  I started noticing interesting details, how dark and light shapes lined up,  where one puzzle piece fit against the next, the design the water was making as it poured over rocks and down the creek, the sound of frogs and birds, and before I knew it that busy, chattering mind had shut off and I was having fun.

Manzanita Tree, Ink & watercolor, 5x16"

As I sketched this spectacular Manzanita, I began noticing how much like strong lean muscles the branches were, with their smooth, polished red surface. Then I found other human attributes: the knotholes looked like eyes while the bends in the branches looked just like elbows. This led me to consider the oneness of all things and I felt very connected to all the nature around me. During our critique at the end of the paint-out, we each take a turn showing our work and talking about our process. When I shared these thoughts someone laughingly asked what I’d eaten for breakfast! I was high on drawing, not Cheerios!

Cat Napping in the Buckwheat, rev2, Ink and watercolor
Cat Napping in the Buckwheat, Ink & watercolor, 4x6"

Walking to our critique, I spotted this garden kittie, having a nice nap in the buckwheat section of the garden and had to stop and sketch it. Nothing bothered this plump pussy who slept amidst the plants, little signs, wood chips and stones near the garden entrance. I added the whiskers with white gel pen.

Categories
Bay Area Parks Landscape Oil Painting Outdoors/Landscape Painting Places Plein Air

Martinez Waterfront Park Plein Air Step by Step

6. Martinez Waterfront Final version
6. Martinez Waterfront, oil, 8x8"

When my plein air group at Martinez Waterfront Park last Saturday I really enjoyed the painting process despite getting a late start. Then I tinkered in the studio, never one to leave well enough alone. Above is the final version and below are the steps I took to get there, recorded just for fun. First is the thumbnail sketch/value study:

1. Thumbnail, pencil
1. Thumbnail/value study

Then I blocked in the colors using really thin paint at the average color of each of the large shapes and planes or puzzle pieces as I like to think of them.  I was pleased to see I did the drawing pretty well, and was able to fit everything on the square panel in about the same proportions as I saw them and as in my thumbnail sketch.