
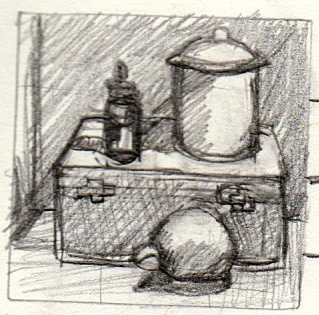
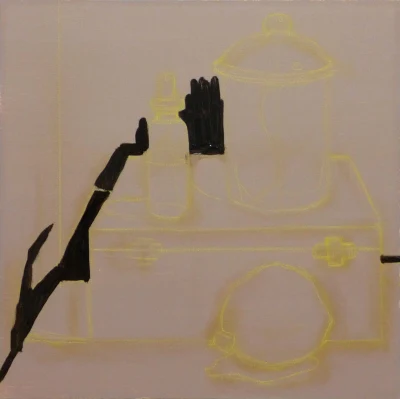
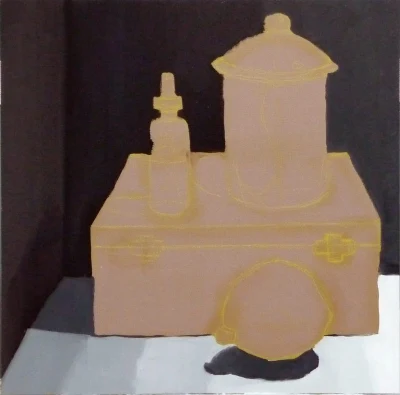
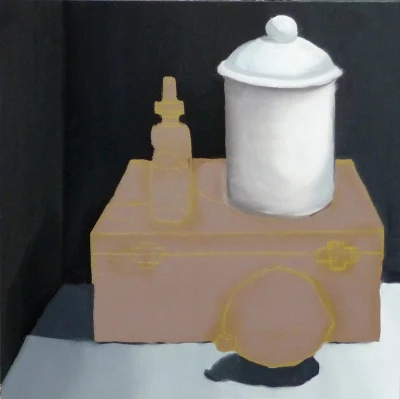
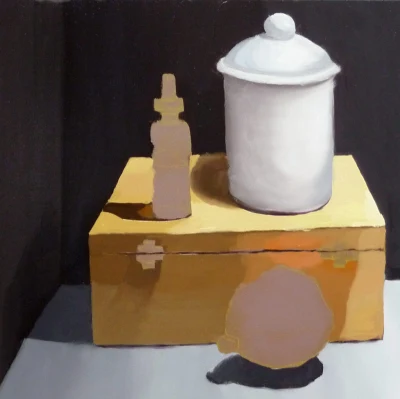
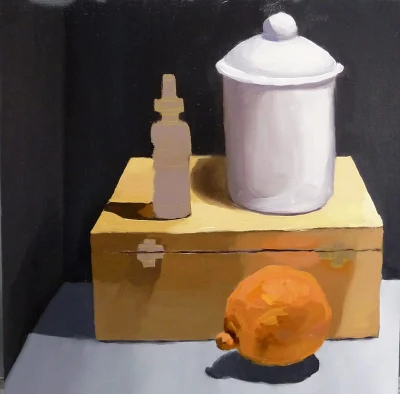
Inspired by Casey’s success with the Carder Method and frustrated with my own slow progress at oil painting, I bought the Carder Method video and Color Checker tool. Below are step by step photos of my using the method to paint this still life, a brief review of the Carder Method and photos of my studio set up for working with it.
The Carder Method is designed to eliminate many of the problems that can make painting difficult. By creating an carefully lit, controlled environment, a painter can focus on learning to clearly see color and value differences while eliminating problems caused by variables such as changing light.
Click “Continue Reading” to see photos and read more….
Using a limited palette and a slow drying medium, you pre-mix colors for one object at a time, on a value scale of about 10 steps (if going from near black to near white), from the darkest dark to the lightest light in each object. Then using the little Color Checker, you match the colors you see in your subject, small section by section, to the colors you’ve mixed, adjusting the paint for color temperature as you go. On the video Mark Carder also teaches foolproof drawing techniques using a proportional divider tool, but I felt confident enough in my drawing to work freehand, while still picking up some good tips watching that section.
I’ve learned from reading Munsell’s book on color theory how the human visual system is designed to compensate for changing colors in nature so that we always recognize a tree as green, even when a sunset has made it appear brown, or fog has made it a pale gray, or dusk has turned it black against a violet sky.
That same visual system favors our seeing colors as the same when they’re separated from each other. A red shirt and a red skirt will look like they match when across the room from each other. It’s only when they’re held next to each other and in the same light that we can the differences.
The Color Checker puts the color you’re mixing visually next to the color of the object you’re painting and helps override that internal system. I’d been doing the same thing using a piece of cardstock but the color checker works even better.
I think the Carder Method creates an ideal framework for learning to paint with oils. It’s opened my eyes to just how “off” my ability to really see color and value differences was before and put me on the right path to learning to see more clearly. There’s much more information on the Carder website and lively discussion on its Forum.
Of course, this method is the absolute opposite of painting plein air where nothing is under control, but I think I’ll be able to apply what I’m learning in the studio using this method in that wild and wooly environment too.
Here’s a step by step of the painting process and some photos of my studio set up for the Carder Method.

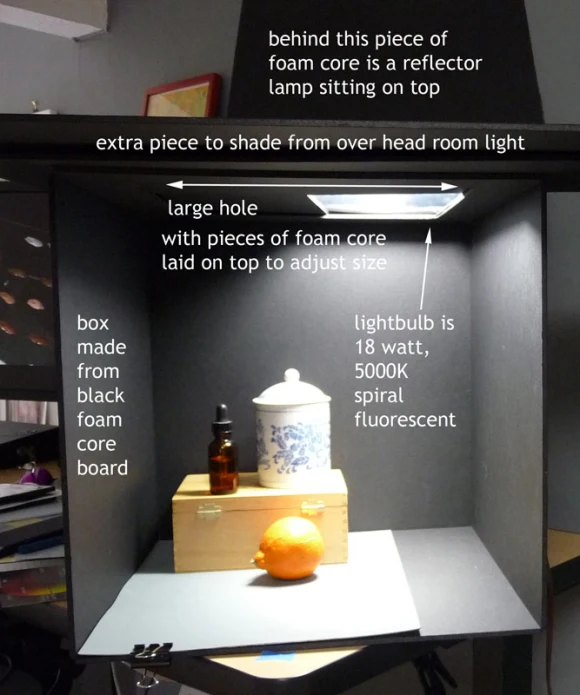
There’s a space in the back on top to drop down a background cloth: a slot made by placing the top not quite all the way to the back.
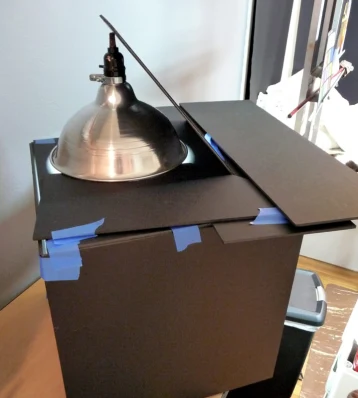
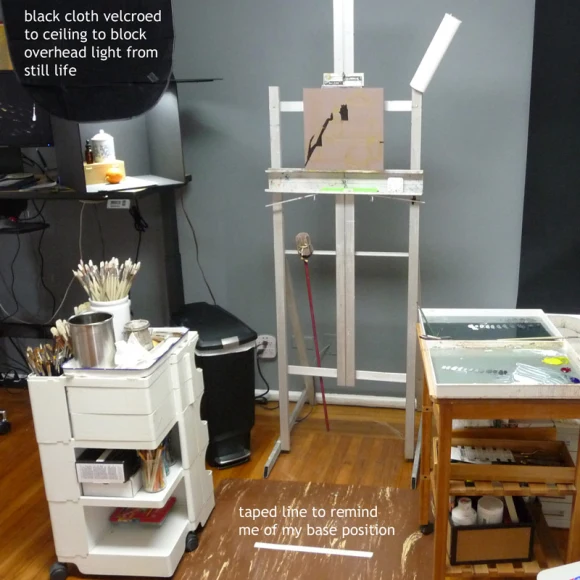
On the right of the photo above, you can see a bit of the black-out shades from Ikea covering the windows. There is a black cloth velcroed to the ceiling on the upper left to block the light coming from the overhead light (48″ wide color-balanced 4-tube fluorescent lighting, all 5000K). I’d painted the wall behind my easel a neutral mid-value gray (Benjamin Moore Whale Gray#2134-40 Aura Matte Finish, eco-friendly, no smell, one coat coverage) to get rid of glare when painting. It also to help with photographing what’s on my easel.
55 replies on “Painting a Still Life Using The Carder Method””
!!!!!!!!!!!That’s the sound of my jaw dropping. This is excellent – I especially like the bottle with the eye-dropper (is that where you keep the clove oil?) Your set up is really good too – better than mine which still has a few problems. I can never orient the lights exactly right. Thing really get interesting when we can learn from each other as well as Mark Carder. I plan on switching over to your medium recipe when I get back from the States. I’m really looking forward to talking about this with you in person. I’m also getting a bad case of light-box envy looking at your photos – I’ll have to do mine over when I get back!
LikeLike
Hi Casey, I agree that it will be great to talk more about this process. If
there’s time, you’re welcome to come by and visit my studio where we can
compare notes. Making the box was super easy! My clove oil came in a similar
little bottle, but not that one. I posted a few questions on the Carder
Forum, and then was able to answer a few of them for myself by experimenting
a bit (with color and lighting). I’ve finally got the whites balanced and
the lighting worked out. And I found I had to add the Cad Red Deep Mark
suggests as an addition (and a little Cad Orange) to get a warm enough
bright orange for the tangelos. But I’m surprised to find that I very much
like working with a limited palette (so far).
Jana
LikeLike
Gorgeous, gorgeous! Can’t say enough about the wonderful light and range of values you’ve achieved!
LikeLike
Yay! Thanks Shirley. Those were exactly the goals I was aiming for!. Jana
LikeLike
Wow! Now I have to go buy this video! Your results are awesome and thank you for sharing your setup. I have something to work on!
LikeLike
Thanks Raena, It was definitely eye-opening, and though not cheap, was very
worth it to me. I just visited your blog and absolutely love your wonderful
sketches! Lots of verve! (and I looked up “verve” to check and it was
exactly the right word!) Jana
LikeLike
I just lost this post so will try, again. Beautiful painting and I do like your cookie jar. Thanks for the demo. Several years ago I saved a demo for a similar box from Alison’s Australia blog, but I lost it. Also, I missed Casey’s blog. I must renovate my room to fit this in so thanks for your post and the Carder link.
annie
LikeLike
Thanks Annie for trying again to post your comment. I’m sorry it
disappeared. It’s so frustrating when that happens. Casey has been doing
some great work lately. Did you see the link to her blog? I remember Alison
making a shadow box too. Thanks for the reminder to see what she’s been up
to. It’s been too long since I’ve visited her. Jana
LikeLike
I love the painting! Would this approach work with watercolor?
LikeLike
Thanks Gwendolyn, for the great question about whether it would work for
watercolor. I’ve been pondering your question all day. I think most of it
would work with watercolor just fine. The only thing that would be different
is that the method assumes you’re working wet into wet, with paint that is
slow to dry. You do one color spot or section at a time and then the next.
Then you can blend them afterward.
With watercolor, where it’s so critical for control that you have just the
right ratio of water to paint, you would probably want to wait for one
section to dry before painting another adjacent to it (if you don’t want the
2 colors to interact). That might create some hard edges you wouldn’t want,
within a shape. Or you could use paint mixed with water to a creamy state
rather than a watery state, and just work quickly, seeing, mixing and
applying each color beside the next. I’ll have to give it a try. I got some
lovely roses for Mothers Day that would be fun to paint in watercolor.
Jana
LikeLike
Great post. There are so many methods available. Glad to see you’ve found one that works for you. Your still life box set up is great. I need that!
LikeLike
Thanks Ed. It is nice having a good shadow box and it was so easy to make. A
foam core board cut into squares and some tape. I can’t believe how long I
put up with the funky cardboard box I was using before.
Jana
LikeLike
Awesome post! I am not familiar with the Carder Method, but this post has sparked my interest. I will definitely look into picking up this video. Thanks for sharing!
LikeLike
Wow, Jana. Great work on the painting. That tangelo is especially wonderful. What a set up you have here, and thanks for this detailed explanation and all the photos. I’ve seen this method before, but never knew anyone that used it. It looks very effective, did you enjoy the doing of it?
Nel
LikeLike
Jana, this is fascinating. I am totally inspired! Your painting is gorgeous, the shading and colors perfect. And now this DVD is really tempting me…
LikeLike
Totally amazing post, Jana. Thanks for sharing your considerable knowledge and learning!
LikeLike
nice painting Jana! That process really worked for you.
LikeLike
Wow, the method seems to work really well for you. Great painting, and thanks for sharing your process. I wish even more artists did that, it’s so valuable to me.
LikeLike
What a great blog you have. I am always amazed when I visit. I think I will just drop by for a minute and then a half an hour later, well you know.
Thanks again.
LikeLike
Wow. When I saw the finished painting, I actually believed it was the source photo for something I was going to see when I scrolled down. Gorgeous work. i’ve never tried oils, but it seems daunting.
LikeLike
Lovely painting. I just finished watching Mark’s video and found it to be inspiring. I also found your step by steps very helpful. Thanks for sharing this information.
LikeLike
Jana-I found your blog by searching for information on composing still lifes. I am a quilter and was looking for a way to put a simple composition together. I was also surprised and really pleased to see that you are my neighbor (sort of!). I live in Concord and have been to Tilden Park quite a bit. I enjoyed your postings about Berkeley too-so often Blogland makes you feel like everyone is somewhere else and it is always nice to find someone close by. Thanks again!
LikeLike
Jana,
Thank you for making Mark Carder’s system easier to understand. I have a lot of books and have spent hard earned money on materials that were not as plain as it should have been for an absoulte beginner. I plan to go back over your notes as to how to create the set up and if I am successful with that then I will purchase the MC program. I have bookmarked your site and if there other programs to help beginners would someone please share them.
Once again, thanks
GG
LikeLike
wow…wow….wow. U make setting up a light box and professional studio look easy! I will train my mind to think positively – if you can do it I can too, right!
I have ordered the DVD on the Carder Method – I live in South Africa, so I’m wonderign how long it might take…it’s already been 2 weeks so I am anxious to begin already!
I’m also impressed that you blog. Thank you for sharing, and for your time and effort to do so.
LikeLike
Thanks Michelle. Just allow yourself plenty of time to watch and re-watch the video and mix the paints and set up the studio. Be sure to request membership to their very active and generous online discussion group. There is a wealth of information there and people are very helpful. The lighting is really critical — having the same light on the canvas and still life was the most challenging part. Getting all of the paints mixed just right was tricky too. But it was so worth it! Best of luck! Jana
LikeLike
Dear Jana,
Your paintings are breathtakingly beautiful!
This little grandma would love to do something like this. I admire your paintings sooo much. I’d love to try out the Carder Method and was wondering just how much room it takes to set up a space like you have.
I only have a small space that measures about 49 in. wide and 107 in. long. I know that’s not much room. I have a closet that is positioned about midway on the wall that measures 107 inches, and if I had to I could open the closet door and use this closet space, thus forming a small nook area for my shadow box.
It would be like a T- shape space. I could then set my easel up in the open area outside the little closet space.
I hope this makes sense, If not, would you mind (if it’s not too much trouble), giving me the measurements of the space that you use?
I would be most grateful. I have a disability and desperately need something to enrich my life.
Thank you for your time, and I hope to hear from you soon,
Kindest Regards,
Susan
LikeLike
Hi Jana,
I have been looking for a wheeled storage cart and would
love to know where you bought the white on pictured in
your studio.
Kindest regards,
and
Happy New Year!
Beverly
LikeLike
That appears to be the Art Caddy. You can read more about it at http://www.dickblick.com/products/art-caddy/ (I’m in no way affiliated with them.)
You can also do a search for “taboret”. Hope this helps.
LikeLike
It’s a Boby Taboretbut very similar to the Art Caddy. Jana Bouc
LikeLike
It’s a Bieffe Boby Taboret but also very similar to one Blick has called an Art Caddy.
Jana
LikeLike
Hi Jana,
Thank you so much for posting your step by step painting progress and still life set up! (with lighting). I have been looking into the Carder method and I appreciate you sharing your experiences with us. Thank you! Anne
LikeLike
thank to you I now have an idea on how to set up a shadow box
LikeLike
Hello,
Great information and I love your set up – everything! Can I use Acrylic’s instead of oil’s? I stopped using oil’s and have all my paints in Acrylic. Concerned about putting anything down the drain that would pollute our water – I hope your answer is yes.
LikeLike
wow!!!! nice painting!!!!
LikeLike
Hello, I have always had an interest in canvas oil painting as a hobby,yet,in the past,I lost interest. I felt lost in the many steps required to even a begin. I do have a head start in regard to the primary and secondany colors found in the color wheel as opposites. I called these opposites “neutralizers. Does the Mark Carder method DVD’s include how to paint from photo’s I have taken?. Thank you. Greg Tegman,52,Edmonds Wa.
LikeLike
The DVD doesn’t address painting from photos but on the Carder website Mark says that if you’re going to paint from photos, to do so from your computer monitor if possible, rather than from a print since that’s more like working from life. Jana
LikeLike
I’ve just recently bought the Portrait DVD by Mark Carder and he actually does not recommend using a monitor. He recommends using photoshop to get the image correct, then print off a decent colour A4 sized photo. He then puts this behind a glass frame and stands it upright and paints his mixed colours over it to make sure the colour matches that of the photograph. This way he has makes his realistic pallete of colours.
LikeLike
Gorgeous! I loved. But I don’t know “about the black clothes and the black walls”. I will disappear with the Rio’s sun!
Kisses from Brazil
Jana
LikeLike
Jana, I am delighted to have linked to your site through amazon. I have been desiring to study the Carder Method for nearly 2 years…..I am a slow and late bloomer. Anyway, I find your experience very helpful, thank you for sharing. I will be investing this fall, after traveling the rest of this summer season. I would love to find a gently used version of his course, do you know of any? Blessings and thank you for sharing.
LikeLike
Hi Susan, I’m pretty sure I’ve seen some on ebay or amazon, but unless you buy from him, I don’t think you can use your email address to log in to be part of the online forum/discussion. Let us know how you go!
LikeLike
I have the Carder color checker tool. I don’t understand how they get half of it filled with color to check against the object. i hear that the video explains it but I can’t afford that right now. Any help would be appreciated.
LikeLike
Hi Terry, I just use my palette knife to smear some of the paint on the end of the color checker checker. Then you hold it up so that half of the little hole is showing you the paint and the other half you’re seeing the object your’e painting. When I’m out plein air painting I often do the same thing using old business cards, putting a bit of paint on the edge and holding it up to the object to see if the color matches. Jana
LikeLike
Awesome work. I’m new to art, by new I mean I painted my first Bob Ross piece only a week ago. Do you think the Mark Carder method is suitable for beginners?
LikeLike
Yes, I do. I think it is very helpful. Jana
LikeLike
Hey,
Awesome post! I love this stuff.
LikeLike
Hi,
I am interested in buying the carder method dvd set. I have always loved art and drawing. I found your article really interesting. I like your shadow box I hope I can build one like yours. What are the measurements on your shadow box? I wanna build one just not sure if I can. Any extra tips on building one?
LikeLike
I’m not sure of the dimensions because it’s just cut up from a piece foam core board and I can assemble it in different ways using tape on corners and setting a piece across the top. I’m thinking it’s about 18″ to 2 feet wide and tall depending how I set it up. If I don’t need it to be that big I use smaller pieces in one direction or another. Hope that helps. Jana
LikeLike
Jana,
A couple of questions. What do you think of Mark’s second DVD, Portrait Painting? Is it helpful? Second, does he get into blending techniques in either DVD set? Mine still feels choppy. Thanks. David.
LikeLike
Hi David, I haven’t seen Mark’s second DVD on portrait painting so I can’t really respond. I looked at his website and see it there, but there’s not much info about it, besides half of it just being him painting. I’d love to know more about it. If you buy it let me know what you think. I don’t remember there being much about blending on the first set, though I’m not real interested in getting things well blended so may have just not remembered. I like a less polished, more expressive finish with the brush stroke showing and letting the viewer’s eye/distance do some of the blending. The one thing I do recall about blending that he says repeatedly is to not blend until you’ve completed getting everything painted. With this method, you mix medium into the paint so it stays wet long enough to do that. Jana
LikeLike
Hi Jana
and thank you for your great article.
Could you tell me please what do you mean for “tangelo repainted”? Tangelo was wiped off like jar and re-painted from the beginning or you simply put some color above the draft (“alla prima”)?
thank you very much for you answer
GILAS
LikeLike
Hi Alessandro, I’m sorry that I can’t reply directly to you but I don’t see your email address. Yes, I wiped off the tangelo and repainted it from the beginning. The paint stays wet quite a long time so it’s easy to wipe off and try again.
Jana
LikeLike
Your painting looks great and well done. The way to keep light always in the same direction and always on the same spots is also interesting. I cannot do oils because of allergies but your work is really inspiring. Somebody was talking about watercolor, and I cannot see why that would be a problem to use similar set-up with watercolor.
Taking about changing lights and colors, I find it very exciting. I think, it’s very important to exercise the visual ability and visual memory. Many artists just use photos, but I know that there are lots of artists like me who don’t want to even think about photos as reference. Such set-up as you have gives the freedom to return to work as you please and still have everything as you left. Great idea. Too bad, I never get time to do anything slowly or taking my time. All my paintings are done in rush, most often I’m doing 2 or 3 at once. It’s because I have very small bits of time here and there.
Your work is outstanding, I will return to check out more since I love your approach to still life.
LikeLike
Thanks for your nice comment. Good for you for painting all you can, even in small bits of time! And your work is quite lovely! Jana
Sketchblog: JanasJournal.com Website: JanaBouc.com UrbanSketchers-BayArea,blogspot.com
LikeLike
Hello Jana, I always love to see new comments about your lovely painting, and one day I hope to have a go. I haven’t bought the Carder method yet, one day when my toddler is older?? I have a few questions, please.
Must you always have a black background? (or is that just easier?) I note that you can drop a different cloth in the background. A lot of the Carder method painting I saw seemed to have a black background from memory.
How much of a chunk of time (approximately) did you sit for to paint the different stages? I mean, was it a day, two hours, etc?
Thanks so much. It is really nice to be able to follow people’s comments and come back again to see your post and painting and be reinspired!
Blessings, Anne
LikeLike
It’s awesome to visit this web site and reading the views of all friends on the topic of this piece of writing, while I am also keen of getting experience.
LikeLike